It all started on a trip to the Mesa Bass Pro Shop. I hadn’t been to that
store in a while because Cabela’s is so much closer to where I live. I
just went down there to see what was new and to see if anything caught my
fancy. They do have some desert pattern camo pants there that I like, for
a good price.
But I stepped up to the optics counter to inquire about what’s new and hot
in laser rangefinders. I’ve been thinking about getting a new one for the
last couple of years, since the angle compensation feature started to become
available from a number of different makers.
Bushnell Yardage Pro Compact 600
I guess that I was a pretty early adopter of laser rangefinders. Back in
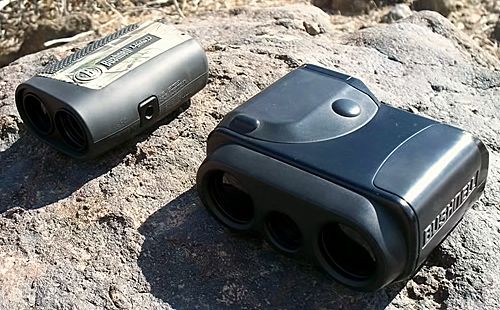
1998 I got my first one, a Bushnell Yardage Pro Compact 600. It has been a
very good unit, serving me well all the years since.
With this rangefinder, I learned the basics of what a rangefinder can and
cannot do. Rated as a 600 yard rangefinder, in normal daylight conditions,
it will usually successfully lock in the high 400’s, maybe low 500’s on
bushes and bare ground. And that’s fine for most hunting situations. If
you cannot get a lock, that just means that you have to stalk closer, that’s
all.
But on overcast days, or when the sun dips below the horizon, locks in the
700’s, 800’s, even 900-yard locks are not unusual. I have even got lock-on
at over 1000 yards with this unit. Even though it has a 3-digit display, I
know when it locks beyond 999, when I see those three digits blinking. When
it cannot get a lock, it just displays three minus signs - - - .
Laser rangefinders use pulses of light in the infra-red spectrum. Bright
sunlight is the enemy of long range target acquisition for these devices.
That’s why when the sun is hiding, you can get longer locks than during bright
mid-day sunshine. Night is the best time to test the maximum limit of target
acquisition for a laser rangefinder.
So like I said, I’ve been very satisfied with this rangefinder, but it is
now 13 years old. Surely, technology must have advanced quite a bit since then.
I’ve been watching with interest, the introduction of tilt-compensating
rangefinders. A basic rangefinder can only give you what is called slant
range, the direct line-of-sight distance between you and the target. But if
there is a significant elevation difference between you and the target, either
above you or below you, then the effective ballistic range will be a
shorter distance than the line-of-sight slant range.
Let’s consider the case of you the hunter, sitting on top of high rock crag,
and you spot your quarry down below you in the valley at the base of the cliff.
Let’s put some numbers on this scenario. You put your laser rangefinder on the
critter and find that he is 300 yards away from you, slant range. But the
downward angle is a steep 45°.
If we were to draw a horizontal line from the game to a point directly
underneath you, the mathematics of trigonometry tells us that this line would
be 212 yards long. This is the effective ballistic range. Your bullet would
drop only as much as it would if fired horizontally for 212 yards, not the 300
yards of the slant range distance.
This is what the new angle compensating rangefinders do for you. They have a
built-in tilt-meter that can accurately measure the up/down angle, and apply
that angle to the slant range measurement to compute the effective ballistic
range for you.
The various rangefinder makers all have their own funny little marketing
catch-phrase for this feature. For example, Leupold calls it TBR for True
Ballistic Range; Nikon calls it ID technology for Incline/Decline; and Bushnell
calls it ARC for Angle Range Compensation.
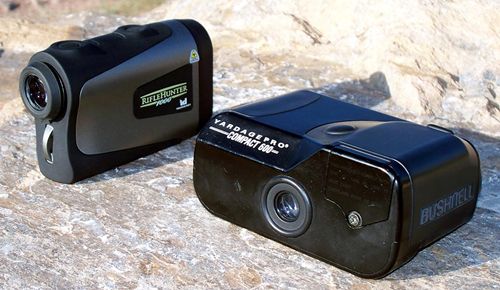
Nikon RifleHunter 1000 (left),
Bushnell Yardage Pro Compact 600 (right)
|
Nikon RifleHunter 1000
Let me take you back to my visit to Bass Pro now. So I tell the guy behind
the optics counter that I’ve been thinking about upgrading to a rangefinder
with angle compensation. “What would you recommend?”
So he reaches under and pulls out a Nikon RifleHunter 1000 model. He starts
talking to me about how this is the hot new rangefinder, telling me about all
the great features. And I’m thinking to myself, “Hmmm, a 1000 yard rangefinder
plus angle compensation. This is just what I’ve been looking for.”
The optics counter is on the second floor. After a horizontal test lase across
the store, I lean down over the rail to take a down-angle reading. The display
shows the angle and gives a number. Since it is in angle compensating mode,
this number is the horizontal ballistic range - verified by switching to regular
mode. Cool.
I noticed one other thing: When I aimed it down at a dark table covering, it
automatically turned on an orange LED to illuminate the LCD characters. Whoa!
I brought it back up to lase horizontally again across the sunlit second floor,
and the characters were the typical un-illuminated black LCD characters. Back
down at the dark tablecloth, orange illumination!
I took it back to the counterman and told him that my wife would kill me if I
bought this today, because I’ve been spending enough lately. So he handed me a
glossy Nikon catalog/magazine to keep me drooling.
When I got home, I did a little web research and from everything I read, this was
indeed the (reasonably-priced) hot rangefinder to get for long range rifle hunting.
My birthday was coming up! I cut out the page for the RifleHunter 1000 from the
Nikon catalog and told Jodi, “This is what I want for my birthday, hon.” And it
worked. On the evening of my birthday, like an excited little kid, I unwrapped
the gift, popped in the battery and stepped outside to play.
I have a couple of mountain ridges surrounding the house. The top of the close
one is almost exactly 300 yards. To the north is another ridge at almost exactly
1000 yards. It was night, the perfect time to see what this thing could really do.
My excitement soon led to major disappointment however. My old buddy, the Bushnell
600, was achieving locks in the dark in the 900’s just below the top of the far
ridge. The best the Nikon could do was in the 700’s further down the slope! This
is supposed to be a 1000-yard rangefinder ?? !! It is being bested by a 13-year-old
600 yard rangefinder!
The Nikon’s optics are 6x compared to 4x of my old Bushnell. The Nikon viewfinder
also has diopter adjustment so that you can focus it to your eye. The clarity of
the optics on the Nikon are head and shoulders better than the Yardage Pro 600.
But notwithstanding the better optics, the angle compensation, the reticle
illumination, if the Nikon could not beat the old Bushnell in a basic test of target
acquisition, then this puppy is a loser.
I gave it one more chance. I headed out to Table Mesa before first light the next
morning for some rifle work. I took along the two rangefinders. As the lights came
up, I was able to easily range a bush on a ridgetop at 800 yards with the Bushnell.
With the Nikon? No way.
It is far better to under-promise and over-deliver. The Bushnell follows this rule.
The Nikon over-promises and under-delivers. Since the entire motivation behind this
purchase was an upgrade over the capabilities of my old rangefinder, the Nikon went
back to the store later that day.
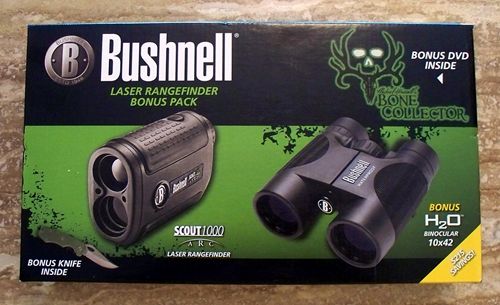
Bushnell Scout 1000 ARC
Combo Package
|
Bushnell Scout 1000 ARC
Several days later, I turned on the Outdoor Channel and what’s playing? It’s a
half-hour long info-mercial on the Bushnell Scout 1000 ARC laser rangefinder!
Obviously, this info-mercial caught a very receptive viewer with its message.
By the end of the show, I was ready to buy.
Yes, it’s another claimed 1000-yard rangefinder. But I had a little more
confidence in Bushnell’s claim to that distance capability than I was now of
Nikon’s, since I have been such a satisfied owner of the Yardage Pro 600.
So back to the web to search for pricing on the Scout. I found it at $300 at
most places. But wait! What’s this? Cabela’s has a combo pack including the
Scout, a 10x42 pair of binoculars, a knife and a DVD, all for only $269. I
really did not need any of the extras, but if the combo price is less than the
rangefinder alone, that’s pretty much a no-brainer.
So I sent my lovely bride back out to Cabela’s with instructions to buy this
package deal for me as I headed off to the office. But while at the office, I
couldn’t resist browsing the web to learn the details of the operation of the
angle compensation mode. I pulled up the owner’s manual and began reading.
I learned that the rangefinder has two angle compensation modes: Bow and Rifle.
In the bow mode, it does pretty much what I expected. It gives you the slant
range in the main display, but in a secondary display on the screen, it gives
you the angle-compensated horizontal range. They describe this as the “shoot
as” distance. Bow mode operates to a maximum of 99 yards.
But in rifle mode, Bushnell does something entirely different. The rangefinder
is pre-programmed with 10 ballistic curves. Curves A through H are for
centerfire rifles, while curves I and J are for muzzleloaders. To use the
rangefinder in rifle mode, you need to pick the curve that is the closest match
for your rifle. Tables and lists to help you choose are provided in a CD in the
box, and on the website.
Then when you range a target, the main display gives you the slant range, but
the secondary display tells you how high to hold over the target in inches (if
you’ve chosen yards as your distance measurement unit) or in centimeters (if
you’ve chosen meters). To give you the holdover number, it takes into account
your chosen ballistic curve, the distance ranged, and the angle of incline/decline.
Wait a minute! That sucks! You have no option to display the horizontal
ballistic range in rifle mode. To be able to use this you have to know with good
certainty, the size of your target at the receiving end so that you can estimate
how high to hold your crosshairs.
If you have a scope with a mil-dot reticle, or a ballistic reticle, now you have
to do math in your head. Ok, the distance ranged is XXX, my drop dots are at X.X
MOA (minutes-of-angle), so that means that I have to hold, now let’s see (calculate,
calculate) … Groan!!
But I thought that I had seen somewhere that holdover in MOA was one of the setup
options. That would actually make this scheme useful. After some more browsing
around, I found out that yes, holdover in MOA is an option, in Bushnell’s next
higher level of rangefinders – the Legend 1200, the Elite 1600, and the Fusion
1600 rangefinding binoculars.
So sadly, when I got home, I had to tell my lovely spouse that the Scout 1000 combo
package had to go back to the store as well. Never opened the box. Strike Two.
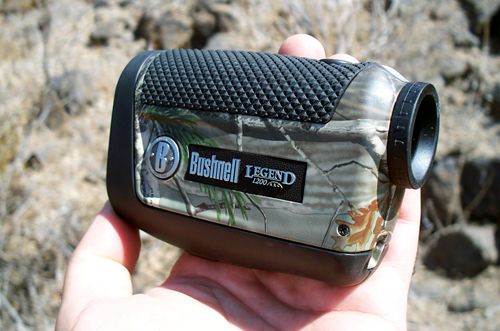
Bushnell Legend 1200 ARC Laser Rangefinder
|
Bushnell Legend 1200 ARC
On learning these details, I immediately started browsing for price on the Bushnell
Legend 1200. I found it on Amazon.com for $300. In the stores, Cabela’s and Bass
Pro, it was going for $50 more. Buy it locally, and you add tax on top of that.
Normally, if you order online, you suffer the “tax” of shipping charges, but Amazon
was offering free shipping if I signed up for a 30-day trial “Prime” membership.
Done. The Legend 1200 even arrived the very next day!
After opening the box, I moved quickly through the setup menus, having already read
the instruction manual online. For first checkout, I just picked one of the ballistic
profiles in the middle, curve “E”.
One other improvement, besides the ability to choose MOA for your holdover option, is
that you also get the option to choose your sight-in zero distance. On the Scout 1000,
the ballistic curves are all predicated on a 100 yard zero. I’m used to sighting in my
rifles with a 215 to 220 yard zero. Being limited to a 100 yard zero would mean that
you need to start holding high in as little as 150 to 175 yards. With my preferred zero,
you don’t need to start thinking about ballistic drop until you’re past 250 yards.
The Bushnell Legend 1200 ARC allows you the option of choosing a 100, 150, 200, or
300 yard zero. Bushnell’s marketing phrase for this feature is VSI for Variable
Sight-In. Moving through the setup options, I chose the 200 yard zero.
Ok, so now it’s the moment of truth – time to take it outside to bounce some invisible
laser beams off my ridgetops. Bingo, bango, bongo – I’m getting hits in the 10s, 11s,
12s, and even 1300+ yards!
One thing I learned is that it is more difficult to hold this small over-under rangefinder
steady, than it is to hold steady my old side-by-side, binocular format Bushnell 600.
That’s just something that I’m going to have to get used to.
When I brought the rangefinder in to more reasonable shooting distances, such as 300 to
500 yards, I got to see how the holdover function in MOA works. I hit a scrawny palo
verde tree on the skyline of the close-in ridge across the street from my house. The main
display called out 294 yards. The secondary display blinked back and forth, reading an
up-angle of 16°, and a holdover of 1.8 MOA.
Then I hit a rocky outcrop further down the ridge. The display showed that the target was
at a slant range of 413 yards, at a +10° up angle, and that I should hold 5.2 MOA high.
Are you starting to see the power of this tiny hand-held ballistic computer? With tactical
turrets or a ballistic reticle on your scope, range compensation is a snap.
I walked backed into the house and announced with a big smile on my face, “We have a winner!”
While earlier discussing the Nikon RifleHunter 1000, I mentioned heading out to Table Mesa
for some rifle work. This year I was drawn for deer in Hunt Unit 21. I’ve been working up
a load for my lightweight Browning A-Bolt in caliber .260 Remington. I also put a new scope
on the rifle this year. It is a Weaver 3-9x40 with a ballistic reticle. So I’ve been going
out several times since being notified of the draw to get me and the rifle ready for the hunt.
Unfortunately, Weaver did not mention the MOA values of the ballistic drop dots anywhere in
the scope’s literature. To find out, at exactly 100 yards I hung a
special target consisting of an aim point near the top
with a 1-inch grid scale going down. By carefully reading where the drop dots fell on the
grid scale, I was able to determine that the drop dots were at 2.0,
4.5, and 7.5 MOA.
After trying and chronographing several powder charge levels, I had settled on a load which
threw the 130 grain Nosler AccuBond out of my barrel at 2775 fps. Of course this exact
combination was not one of the loads in Bushnell’s literature. But they give you an
alternate, generic method of determining which ballistic curve to use. Assuming a 100
yard zero,
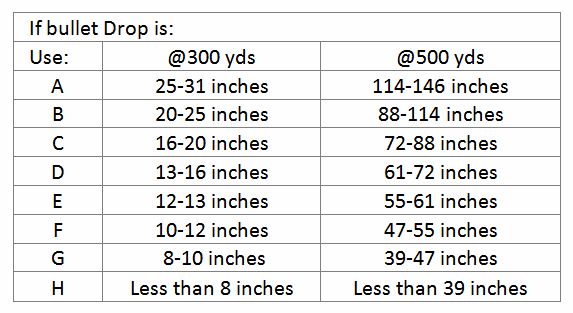
So I ran the ballistics for my load on the computer, assuming a 100 yard zero. This
showed that my 300 yard drop should be 12.5 inches. Based on this, I chose to set up
the rangefinder using curve “E”, with a 200 yard zero.
I set up a paper target at exactly 200 yards and worked to get my zero as dead-nuts
perfect as possible. Now it is proof-time.
Gerhard has set up some steel swingers at our Table Mesa shooting spot at various
locations. From where I was shooting, there was one on top of a hill at 440 yards. I
hit it with the Legend and it told me to hold at 6.9 MOA high. Remember that my scope
has a drop dot at 7.5 MOA.
I interpolated my hold, squeezed and fired. A miss. Huh? Again. Another miss. Again.
This time, through the recoil, I could see that I was shooting over the target. Too much
holdover! I sat and thought about it for a moment. I decided two things: To use the
next flatter ballistic curve, “F”; and to hold slightly into the wind.
Curve F told me that I should hold at 6.0 MOA, exactly halfway between my two lowest drop
dots. Lets take a moment to translate that into actual inches at the target: It would be
(440/100) x (6.9-6.0) = 4 inches lower. That change plus shading the wind did the trick.
I hit the target every time after that!
Well this neat little toy is definitely going to change my old habits of long distance
trajectory compensation. Like I said earlier, this one is a winner!

![]()
