Some ideas are so good that they trigger the “why didn’t I
think of this before” reaction. This happened to me just recently, while
helping the Arizona Game and Fish Department with their annual pheasant
hunt for some young Hunter Safety Course graduates. Available for
browsing at the hunt club supporting the event were some fine hunting
magazines, usually not seen in the entertainment aisle of your local
Safeway. Unfortunately, I don’t remember their titles. But I remember
the advertising picture, of a very short shotgun shell!
The standard 12 gauge 2¾ shell can launch quite a payload, up to an ounce
and a half of lead. That seemed to have been useful when waterfowl could
still be addressed with the toxic substance. Today maybe fur hunters still
employ those. Target shooters have gone the opposite direction, as far
down as 7/8 ounces. If you look at the respective wads, there’s a lot of
‘space’ between gas seal and shot compartment.
The Idea
So what about short shotgun shells? So, nothing. Unless you either own a
very fine old European scattergun, or enjoy practical matches with stages for
riot shotguns. To the point, some older 12 gauge shotguns evidently have
chambers significantly shorter then the standard 2¾ inches. And how many
shells could I stuff into my Mossberg riot pumper if they were that short?
And would they function, cycle through that action? Turns out that Ballistic
Products, Inc. sells those shorties, amongst other shotgun specialties.
Even though they are very expensive (for my wallet anyway) I ordered a box
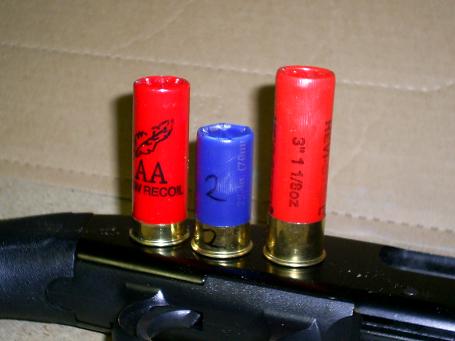
each of 12ga-2.5” and 12ga 2”. That’s right, they come that short. To get
right to it, both cycled through the Mossberg. But more on this later.
Test-firing them once they also cycled the action of a Franchi 48, the
two-incher barely so.
The Better(?) Way
I wanted to work on the ‘short’ concept in three ways: cost, shot size, and
power. A few Sundays ago it rained all day. Perfect conditions to spend
time in my garage. Could I make my own short 12 gauge ammo? And increase
the payload to one ounce? And do so with shot sizes of greater than #6? I
believe steel targets such as poppers actuate more reliably with larger shot
size. Ballistic Products Inc offers limited load data, so I had a starting
point.
Cutting:
First the ‘normal’ hulls had to be shortened. The bread-and-butter Winchester
AA hull is not a good candidate. Others, like Federal, Fiocchi and PMC, for
example, offer greater internal capacity. And, as it turned out, the plastic
wall thicknesses varies between types. Thinner hulls seemed to work better.
What I had most on hand were Federal cases, low brass with chrome finish.
Some sort of fixture would surely make it easier to cut the hulls to the same
length, and do so uniformly and easily. Yes, such tools are available to
purchase. But this was Sunday, with rain, with a need for “now”. I lucked
out right away. A wooden ¾ inch diameter dowel fits tightly into an empty
12ga hull. Some diameter reduction of the first 1.7 inches allows that the
dowel will easily go into the hull, with only that portion tightly grabbing
the dowel that will be cut off.
There needed to be a pilot at one end. A screw (with head cut off) that just
fit through the primer flash hole (a nail of equal thickness would also do
fine) made an adequate pilot. I had my finished driver for cutting.
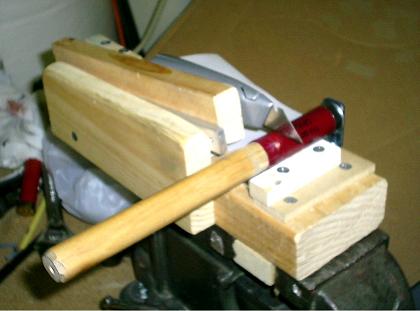
A Stanley utility knife, with drywall screws through the holes in the handle,
was used to cut the plastic. I attached the knife to a short piece of 1x2 to
allow repeat placement of the blade. The final ‘jig’ is best described in a
picture.
All arranged and bolted down on a short piece of 2x4, a small angle iron and
two wooden alignment rails support the hull during the cutting process. The
knife and 1x2 rests against a section of 1x4 board as guide and determines how
short the cut will be. After about a half hour of tinkering to build this jig,
I could make repeatable cuts on empty 12 gauge hulls. It’s actually very easy
now.
First, size a fired 12 gauge, which also punches out the old primer. Push the
sized hull onto the dowel until the pilot at the end pokes through the primer
hole. Insert the pilot into the hole on the angle iron and rest the plastic
hull on the rails. Then apply light pressure on the utility knife while
slightly pushing the empty against the angle iron and down against the rails.
Now slowly turn the dowel/hull clockwise. A few rotations, and we have a
shortened hull.
Loading:
The ‘factory’ 2-inch load throws 7/8 ounces of #7 or #6 lead. I wanted a full
ounce, of at least #4. To say it up front, yes, Federal, Fiocchi and PMC hulls
can contain such payload. But how do you close the shell up, in the end?
Again, a little luck prevailed. A 6-fold crimp starter by itself will get us
there. I chose one from Lee, but a Mec will also work. A 12 gauge shell base
has the same diameter as my Pacific press ram for metallic cartridges.
We are now at the stage where a hull has received primer, powder, wad, and shot.
With no shell holder or die in the press I can place a shotgun hull on top of
the ram, position the crimp starter on the hull mouth, then slowly lower the
handle (the crimp starter eventually hits the top of the press frame; then the
hull is forced into the crimp starter) until I feel the correct resistance.
Bingo, my new-cut short shell was crimped, ready for final closure.
That would be the biggest issue and required the most drastic measure. A 12
gauge die set for a Mec Junior was on hand. Yeah buddy, I took the hacksaw to
its closing die. By cutting the lower portion off it became short enough for
my home-made shorties. Placed under a little arbor press (your metallic
cartridge press, drill press, etc would work as well), my short shell did
indeed close up, nicely. It does require ‘feel’, knowing when to quit
compressing, but they came out looking fine indeed.
Note that I omitted the details. Ballistic Products does have some load data,
but I did not follow all of it. For one, they advertised a roll crimp, yet I
did not want to get into that. For another, they offer all sorts of gas seals,
felt wads, paper wads, cork wads, plastic wads, overshot cards, etc. to fill
the space inside our hulls. My approach deviated some, and I am not advertising
that you should follow what I tried. The take-away is that anyone can load
short shotgun ammo.
Testing:
The Mossberg easily accepted nine short ones in its tubular magazine. Compare
that to seven ‘normal’ shells. Then I pressed the release button and cycled the
action rapidly. All nine came back out, thus appeared to show ‘action-compatibility’.
Then I fired one, and all felt normal. This was another mistake. These little
shells seemed ‘too precious’ to me for extended practice.
Next came the Franchi 48. Because of its design, the ammo can not be manually
cycled through the action. So I pulled the trigger, but only three times. The
gun functioned normally, with slightly less recoil than normal.
Since I fire this short ammo in standard 2¾ inch chambers, the actual length for
the shortened hull is of no consequence to me. Ballistic Products points out
that a roll crimp requires less length than a fold crimp. Again, that wasn’t
my objective. Stuffing as many loaded rounds as possible into a tubular
magazine was!
It turned out that 2-1/8 inches of hull length was the lower limit for my 1-oz
load when using a 6-fold crimp. Those loaded shells came out actually slightly
shorter than the ‘factory’ 2” version with its roll crimp, to the tune that my
Mossberg can hold nine of the ‘factory’ shells, but ten (!) of my self-rolled
ones.
Then came the first ‘use’, under the clock. I pressed the short shells into
service during our HSC 3-Gun shoot. With gun fully loaded, two of the nine
shorties hung up in the action, consequently punishing my scores. I simply had
not tested this type of ammo in this gun enough.
The reason for failure to feed is the pivoting loading lever that lifts a shell
from the magazine in front of the chamber. On the Mossberg it is just long
enough for a regular 12 gauge shell. Any shorter shell could, and eventually
will, hang up. Yes, there’s always something!
I wasn’t done, though. So the Mossberg wouldn’t play my game. What about the
Franchi? It turns out that a magazine extension intended for a Remington 1100
also screws right onto my Franchi. That enhanced its normal capacity to 9 + 1.
Then the shorties got their turn. A full dozen found a home in there! But
would they function?
Due to other distractions, also referred to as real life, this little nagging
question remained until the next 3-gun event. I dared yet again. Ironically,
the stage happened to require 13 rounds of bird shot, then two rifled slugs.
Twelve shorties occupied the tube and a regular shell waited in the chamber
when the buzzer went off. Ms. Franchi downed 13 poppers in rapid succession.
I then loaded two slugs. The fact that they both found the A-zone just added
icing on my cake.
Bottom Line:
If you want to increase your riot gun ‘capacity’, shorter ammo is one way.
Loading shorter shells is relatively easy to achieve, just time-consuming
compared to running a progressive.

![]()


