| Articles | Documents | Equipment | Events | Links | Membership | Miscellaneous | Scrapbook | Targets | What's New |
| My Own C.S.S. Merrimack | September 1997 | |||
| Dan Martinez | ||||
My 6 year old son, Bennet and I awoke around 4 A.M. We were headed to Horseshoe
Lake to make the annual attempt to down a Christmas goose.
On one other waterfowling adventure to Horseshoe two years prior, I actually
had geese fly close enough for a shot. Unfortunately, the only 12 gauge I owned
wore a scope and a .223 rifle barrel, so my 20
gauge O/U was pressed into service as a waterfowl gun. Loaded with #2 steel shot,
the heaviest load you can find in 20 gauge, it was no match for the big Canadians.
I fired two shots in their direction, but they never missed a beat.
I was ready the next season, having picked up a synthetic-stocked Remington 870
Express in 12 gauge. Despite a memorable trip to Mormon
Lake where it performed yeoman's service by knocking down a number of ducks, I
never did get a chance to test it on the big honkers that season.
Which brings me back to December 1996. Ben and I pushed off from the boat ramp in
the pre-dawn darkness. The electric motor purred quietly as we took off across the
lake toward the Verde River end. We found ourselves in a marshy area looking
eastward with a tall screen of vegetation behind us, separating us from the main
river channel.
As the sky lightened we saw a few flocks of ducks flying around, but none came in
range. Then I heard it: the unmistakable sound of Canadian honkers. At that point,
I had no idea of where they were, but I fished around in my vest for my goose call
anyway. I really didn't expect to be able to call them in - I only wanted a chance
to talk to them. But after about two honks from my horn, they came into view!
There were five of them, forming a mini-V, about 500 yards out - and they were
headed right toward us! I frantically worked the pump, jacking out the #3 duck
loads, and jacking in the 3" magnum load of steel BBs. I even managed one or two
more honks during this time, to keep 'em coming.
As I finished getting the third round into the gun (two in the mag and one in the
chamber), I pointed the 28" barrel at the V. They were definitely flying low
enough for a sporting chance, they just needed to get a little closer . . . Come
on, come on . . . but at about the 70 yard point, they must have sensed that
something wasn't kosher. They suddenly veered and flew off up river! Damn!
This is one of those scenes that's gets played over and over in your mind. That
night while lying in bed around midnight, the tape of the encounter was playing in
my head. What had gone wrong? Obviously we were just too visible. We were
sitting in the canoe facing east, into the sun. The birds were flying westward,
toward us, and the brightening eastern sky must of had us well illuminated, even
though the screen of vegetation behind us would have helped to break up our
silhouettes. But obviously that wasn't enough.
That's when it hit me; the idea that culminated in the image you see on this page;
the idea to blind my canoe. Yes, I actually got up out of bed, grabbed some spare
tent poles I had laying around, and mocked them up on the canoe on the backyard
lawn in the middle of the night.
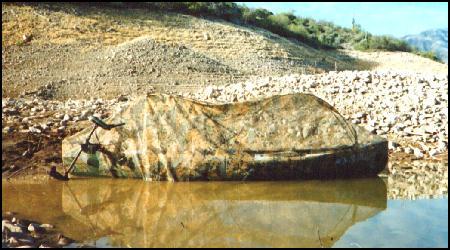
I call the finished product my own Merrimack, because to me, in profile, it
resembles the famous
Confederate ironclad battleship that fought the Union's Monitor to a draw. (If
I would have called it the C.S.S Virginia, most people would have no idea of what I
was talking about.)
Building the Blind
The first thing I did was head to Popular sporting goods to check out what kind
of replacement tent pole kits they had. It turns out that they had two sizes:
7mm and 9mm. Each kit contains 4 poles, shock cord, and an assortment of
ferrules. I opted for 4 of the 7mm kits at $7.99 each.
I assembled one of the kits into a 4 pole loop and held it in place on the
gunwales of the canoe. It looked to be the perfect height. I wanted the tops
of the loops to be about at eye-level. That way, only the top of the head is
normally exposed, and if more concealment is needed, all you've got to do is
hunch down a little. And at that height, it's still easy to peek over the top
for a clear view.
The next problem to solve was how to attach the poles to the canoe. The method
had to be easy to put up and take down, since I cartop my canoe. Checking out
the ferrules supplied in the tent pole kit, I found one that slips onto the end
of the pole and ends in a reduced diameter peg.
First I drilled a hole slightly larger in diameter than the peg, but smaller than
the main body of the ferrule, all the way through both sides of the hollow vinyl
gunwale. I drilled the hole through at an angle instead of straight down to
lessen the bending stress that would be applied to the poles. Next, I opened up
the top hole only, large enough to accept the main body of the ferrule.
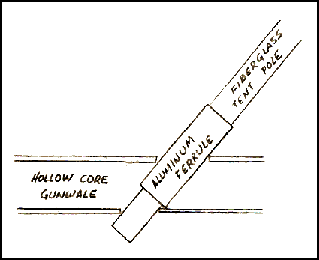
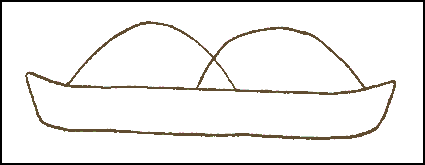
With seven more such holes drilled, the poles were assembled and placed into their holes. Now, the hoops on each side of the canoe look something like this:
Next problem: How to get the camouflage netting onto this framework. I had some netting already, but not enough for this project. I'm using plastic netting (polypropylene?), not burlap, because it dries fast and does not rot. I needed enough to go around the entire perimeter of the canoe. My canoe is 14½' long, so I needed about 10 yards total. Close to my home, Phoenix Sports (now JumboSports) sells this netting off of big rolls about 4½ feet tall for $3.99 a yard. I already had about 4 yards, so I went to the store with the intent to buy 6 more. But when I saw that the guy was measuring yards by spreading his arms wide and saying, "One yard . . . ", I decided that maybe I didn't need another 6 yards after all. (People have an armspan very close to their height, so a six footer would actually be measuring two yards each time.) When I got home, to help me think about how I was going to get the netting onto the frame, I temporarily attached it to the hoops with clothespins. The canoe was sitting on my backyard lawn, with the bottom of the netting just brushing the grass. This way, the entire hull is covered by the netting to the waterline. Set up this way, the netting comes about 12" over the top of the hoops. This extra material was simply folded over the top of the hoops and clothespinned in place. The blind was taking shape, but at that point, it was looking like I would need those clothespins to hold the blind in place out on the water. Well, the very next thing that needed to be done, was to attach my four yard piece of netting to the new netting I had just purchased. So I dug out my wife's sewing machine and reacquainted myself with its operation. After zigzagging the two pieces together, I now had one large piece of netting that would go all the way around, plus. It was actually about four feet too long. When it came time to sew the netting together into one large loop, instead of cutting off the excess length, I left it, which gave me about a four foot long area where the netting is doubled.
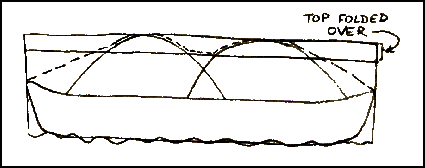
So now I have a continuous loop of netting mocked up all the way around the canoe, and it's starting to become clear what I need to do. In the napkin sketch above, the dotted lines represent where I ended up zigzagging with the sewing machine. Out in the backyard, a technique I found very helpful in fitting the netting to the boat is basting. No, not the kind where you squeeze juice over a turkey to keep it moist. Rather, basting is temporary hand-sewing, using very large stitches, to hold the article together until you can do it over again with the sewing machine. Believe it or not, this is something I learned from my great-grandmother back when I was but a wee slip of a lad.
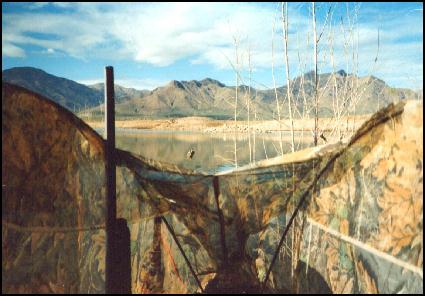
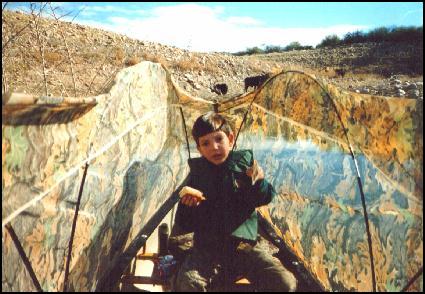
Sewing the folded-over top of the netting around the tops of the loops created four little "pockets" which serve well to hold the netting onto the loops. Clothespins are no longer necessary. From the top of the hoops to the bow and stern points of the canoe, the netting also gets sewn together. This leaves a couple of useless triangular patches of material which were simply snipped off. I only got one chance to field test the Merrimack before the end of the season last year. The weather was warm and clear, in other words, not very ducky. I did get off one good shot as I jumped a quacker while drifting into a small water pocket. My shot was behind him, but I did manage to singe some tail feathers. After he flew past, feathers settled into the water for the next minute or so. I am able to report, however, on the rig's handling with the blind in place. The blind was erected at the boat ramp before getting underway. The sticks go up fast, and actually, I was rather surprised at how easy it was to unfold the netting and get it hung on the loops. There is a cutout for the electric motor, and this serves as an effective index mark for orienting the netting on the boat. Once underway, There were no issues with steerability, or with the netting getting hung up on floating debris. To get into or out of the boat, you simply lift up the material and go through one of the hoops. Visibility for the rear-seated captain is somewhat of an issue, but not a major problem. If needed, I foresee no major problems with leaving it undeployed until anchored at a likely spot, and then deploying the blind from within the boat.
Compared to the open boat, you do get this sort of warm and fuzzy cocoon kind of feeling inside the Merrimack. I'm sure that it helps to deflect some wind, even though the netting is a fairly open weave. Blinding of the occupants is much better in the section where the netting is doubled up. I think you can see that in the first photo in this article. Near the back half, by the motor, is where the material is doubled. Up front is only a single layer of the material, and rocks behind the boat can clearly be made out. I may yet sew another layer of material to the front section of the blind. I lost one ferrule off of one of the pole ends after this first field trial. I found that a sawed-off .223 shell is an effective substitute. I'm looking forward with great anticipation to the upcoming waterfowl season. If I can get out on the water at Mormon Lake, I expect I'll be a real duck slayer. And if I'm really lucky, maybe this will finally be the year for that Christmas goose. © Honeywell Sportsman Club. All rights reserved. | ||||
The Honeywell Sportsman Club is a small group of shooting and outdoor enthusiasts in the
Phoenix, Arizona area. Our website is ad-free and completely free to use for everyone.
But we do have expenses that we need to cover, such as the web hosting fee and our liability
insurance. If you enjoyed visiting our website, found it useful in some way, or if you enjoyed
reading this story, please consider tipping us through our PayPal donation jar below. Thanks for visiting, and come back soon.
![]()
Articles
Docs
Eqpt
Events
Join
Links
Misc
New
Pix
Targets
