I recently started experiencing light primer strikes from my Smith & Wesson Model 686.
At first I chalked it up to hard primers in the batch of handloaded .357 Magnum that I
was shooting. The primers showed a clear firing pin impression, but they did not go
off.
I backed the cylinder up, and re-tried firing them with a second strike, but they still
wouldn’t fire. I put those few rounds back into the bullet box. Others from the same
batch did go off, but there were enough that failed to fire that I was mildly concerned.
Sometime later, I tried those same rounds with the firing pin divot in my short barrel
Model 66, and they all fired reliably. Hmm. That pointed to a problem with the gun,
not with the ammo.
I was teamed up with Wade at this year’s Combo Silhouette Shoot #1 when it happened
again. My 686 is a newer model with the frame-mounted firing pin. When I cleaned the
gun after the shoot, I blasted the firing pin hole with carburetor cleaner from an
aerosol can. I thought that maybe there was some crud built-up between the shoulder
of the firing pin and the frame, preventing the firing pin from traveling fully forward,
causing the light strikes.
I used the gun again in the CF Pistol Silhouette match on July 8th. This time I was
teamed up with Bruce. Anticipating trouble, I wore the Model 66 on my hip to fire
any rounds that failed to ignite in the 686. Yup, I had to use the 66 to light off a
few stubborn rounds. I finished the match with 3 rounds in my bullet box that failed
to fire in the 686 that I did not try to fire in the 66.
After the match this time, I did what many of us do these days: I hopped on the web
and searched for “S&W model 686 light primer strikes”. I came across a discussion
that talked about S&W shortening the firing pin slightly in order to pass California’s
drop safety requirements to be able to get the gun onto the state’s notorious “approved
handgun roster”. The solution offered was to replace the firing pin with a longer one.
The recommendation was a Power Custom firing pin available from Midway USA, so I ordered
one. It was only about 12 bucks.
While waiting for it to arrive, I reviewed some YouTube videos about how to take a 686
apart to replace the firing pin. It turned out to be less scary than I thought it would
be. I won’t go into all the details because you can do the same web lookups that I did.
I will offer this though: Brownell’s had a short, but great video about how to remove
the sideplate without marking up the gun. Hint: no prying! Instead, once the grips and
the sideplate screws are removed, you rap the handle of your screwdriver against the grip
frame. This dislodges the sideplate without even physically touching it. Worked like a
charm!
When the part arrived, I measured the two firing pins. The factory pin measured .489”,
and the new extended firing pin measured .505” – .016” longer. While I had the firing
pin out of the frame, I used a Q-Tip with some solvent on it to clean the firing pin
recess in the frame, just in case there was some crud in there.
Reassembly went fairly smooth. One tricky thing was making sure that the flat on the
firing pin stayed facing down as you held it in against spring pressure as you tried to
re-insert the keeper pin. That took a couple of tries, but I got it done.
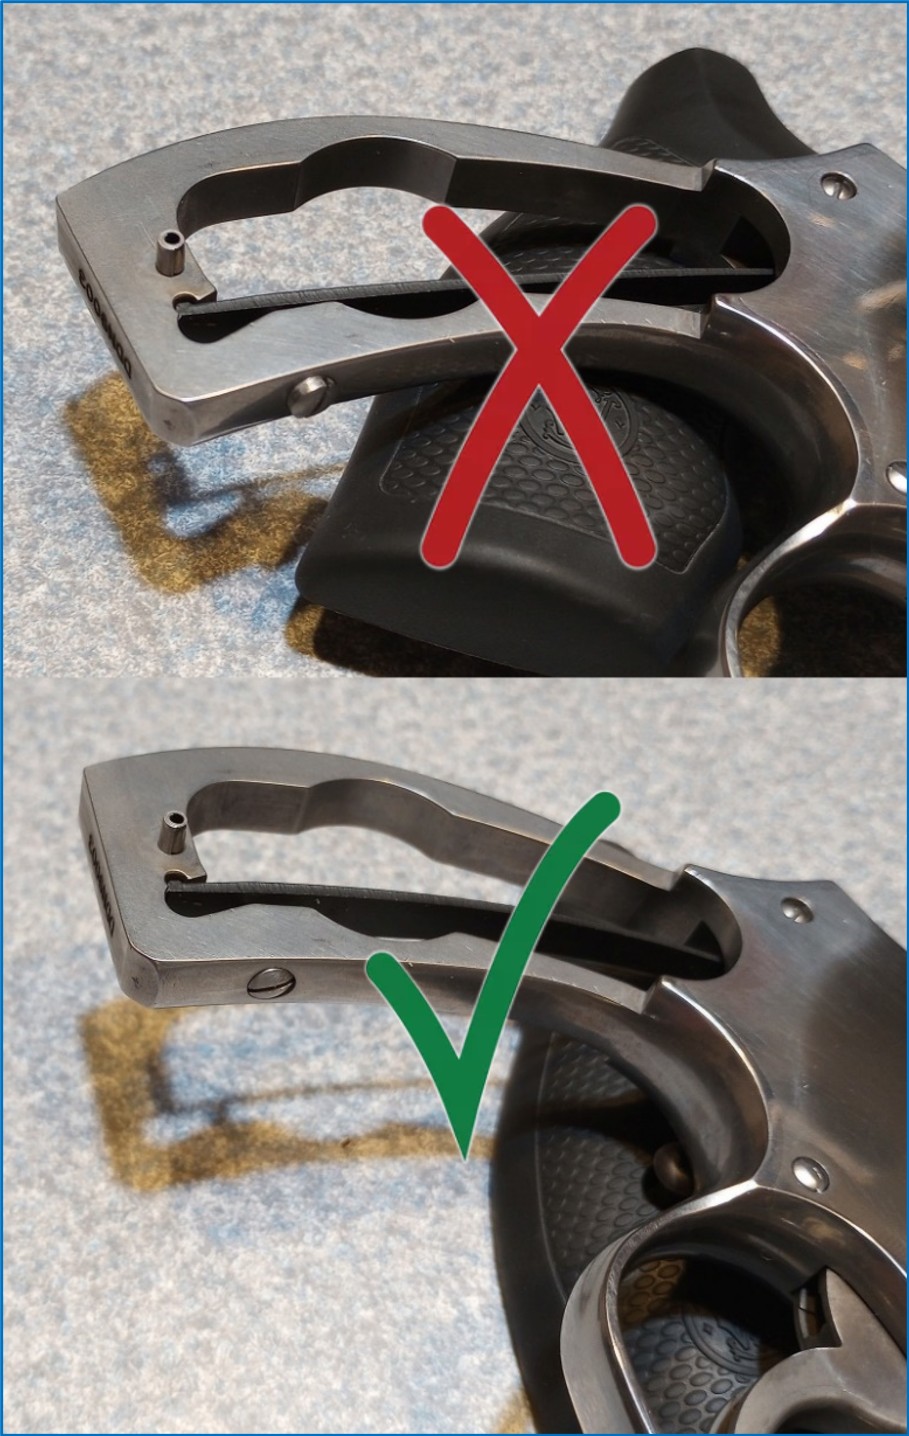
Another tricky little thing was correctly positioning the transfer bar before replacing
the sideplate. I was having trouble getting the sideplate to settle down onto the frame
until I figured out that the transfer bar needed to be positioned so that the pin that
moves it is placed at the bottom of the oblong hole in the transfer bar, not at the top.
See picture below.

With the sideplate now properly seated, I tightened down the sideplate screws, re-installed
the crane and cylinder assembly, then re-installed the rubber grips. Alright! Now I should
be good-to-go, right?
I don’t know why, but a couple of days later I once again did a web search for “S&W model
686 light primer strikes”, but this time I was led to a different issue that might cause
the problem. I was pointed to the “strain screw”.

The strain screw pre-tensions the mainspring. It normally should be fully seated. The only
reason for it to be backed off is for removal/replacement of the mainspring. When I removed
the grip panels to inspect the screw, I found that it was backed out. This was likely my
problem all along. I didn’t need that extended firing pin. Oh well. I tightened the strain
screw, but left the extended firing pin installed.
Well, I just got back from shooting the gun in our Combo Silhouette match #2. I had 100%
reliability. I inspected the fired primers and it did not look like they were being struck
excessively deep by the new extended firing pin. It feels good to once again be able to
trust that the gun will fire when the trigger is pulled.

![]()


