At the end of the Turkey Shoot, after packing up all the gear, as the guys started
filtering out, I hung around. I grabbed a small hiking pack, a hiking pole, and my
GPS. Gerhard noticed and asked with a smile, “Geocaching?” “Yup. Up that way,
about half a mile.” But then I remembered that some time back, I had offered him a
lesson in how to find a down buck across a canyon using a rangefinder and a hand-held
GPS unit. This would be a good opportunity, if he was interested.
He said that he didn’t remember the offer, and I tried reading his face to see if he
wanted to get that lesson right now. It didn’t seem like he was that interested, so
I hiked on. Later, the thought occurred to me that this lesson would make a good
newsletter story, where I could explain the technique to more than just one guy. So
here we go.
First, you need a hand-held GPS unit that has a built-in electronic magnetic compass.
Not all GPS units have that, particularly the low-end ones. I have been using Garmin
60-series GPS units for a quite a few years now. As an avid Geocacher, I have gone
through a few of them. I had to recently replace my last one because it fell overboard
while kayak-caching! My current unit is a Garmin GPSMap 65S.

Garmin GPSMap 65S
|
The second piece of tech you need is a laser rangefinder, something that most hunters
have with them anyways these days. Of course many hunters carry a GPS device with
them as well, but they may not be familiar with all of the functions that the GPS can
offer. The function that we need to use is something called “Sight ‘N Go”. I will
be using my GPSMap 65S to show all the details. If you have a different brand or
model of GPS, you may have the same functionality, but it may be named something
different, or the steps to perform the function may vary, but the idea is the same.
You will be placing a GPS “waypoint” on the deer’s position from your remote position.
In this tutorial I will be showing how to find your buck across a canyon, or some
distance away, where it would be difficult to keep your eyes on the spot where the
buck was standing at the moment that the shot was taken, as you try to make your
way towards him.
Fixing the spot in your mind where the buck stood is known as “marking” the spot.
You may use certain landmarks to help you mentally mark the spot – a certain tree,
an ocotillo, a saguaro, a rock outcropping. As long as you can keep those landmarks
in sight as you go towards the animal, there should be no problem in making your
way to the exact position, and this technique will not be necessary.
The problem comes when you have to cross a canyon bottom. You will lose sight of
your landmarks. When you get onto the animal’s slope, nothing will look the same.
You may be in tall brush making it difficult to re-acquire your landmarks. Your
perspective will change. You may not be able to recognize your landmarks at all
anymore.
Since this technique depends on taking an accurate compass bearing with your GPS,
you should have performed a recent compass calibration. A good time is at the
start of your hunt when you installed fresh batteries.
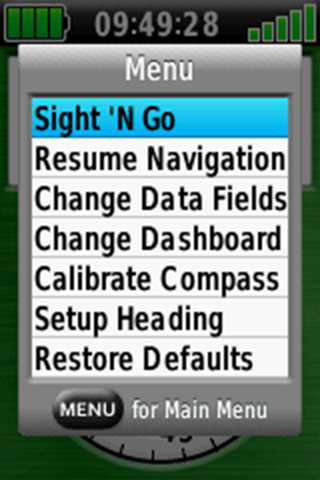
On the GPSMap 65S, from the compass screen, hit the MENU button and scroll down to
Calibrate Compass:
You will be prompted through several steps to slowly rotate the GPS in pitch, roll,
and yaw:
It takes just a few minutes to do this, but it is important to the accuracy of
the Sight ‘N Go waypoint that you will place on the deer.
After the shot, mentally mark the buck’s position as you normally would. Take a
picture in your mind. Grab the GPS and turn it on. While it is acquiring
satellites and getting a position lock, double check the distance to the deer’s
last known position with your rangefinder.
After the GPS has acquired a position lock, give it another minute or two to settle
down. Often the very first lock it gets is not 100% accurate.
Again, from the compass screen press the MENU button. This time you will select
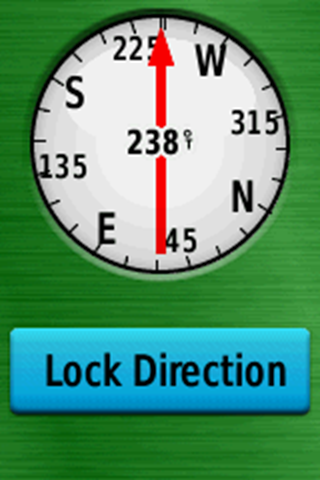
Sight ‘N Go. The GPS will then prompt you to Lock Direction.
Now you simply point the GPS at your marked position on the opposite slope,
and when you are satisfied that you are accurately pointed, hit the ENTER button.
That locks in the compass bearing to the target.
To grab all the GPS screen shots and take a few pictures for this tutorial, I
headed out into the desert and set out an orange flag in a tree. By weird
coincidence, I just happened to set it out at 280 yards away from where I
performed the GPS and rangefinder work for this story.
Having now locked in the compass direction to the buck (flag), the next step is tell the GPS the distance. After you “Lock Direction” you get two choices, “Set Course” or “Project Waypoint”. If you Set Course, it will place a waypoint some arbitrary number of miles away, so that you can travel in the locked direction on that bearing, but that’s not what you want. You want to Project a Waypoint.
When you select Project Waypoint, it first needs to know what distance units
you want to use. Most American hunters have their rangefinders set to yards.
You will then be presented with an input screen to enter the distance. It starts
by showing “0000.00”, with the cursor on the leftmost zero, so you have to either
select the right arrow button, or enter zero into that first position before
entering your actual 3-digit rangefinder distance. Then select Done. You will be
presented with the second screen above, then hit Save. Voila! You have placed a
waypoint on that buck 280 yards away. Notice in that second screen above that the
GPS in this case has chosen to name that waypoint “053”. This is the waypoint that
you will now be navigating to, to find your buck.
As soon as you hit Save, the GPS goes into navigation mode. The screen goes back
to displaying the compass page with a pointer, and the distance-to-go. If
previously you have not, you may have to set up your compass screen to show the
distance-to-destination field, using the “Change Dashboard” and “Change Data Fields”
menu options.
As you make your way to the flag buck, the distance counts down
and the direction arrow points the way. You may have to go around various obstacles
on your way to the buck – trees, brush thickets, the heads of side canyons – doesn’t
matter. Just keep following the arrow as the distance counts down toward zero. You
will get to your waypoint.

13 feet this time from 280 yards away
|
I looked for a cell phone app that has this function, but I didn’t find one. I
know that a lot of people don’t carry a GPS in the field anymore, relying instead
on their phone for backcountry navigation. This is a good reason to still have a
hiking-style GPS with you. This technique can save a hunter a lot of grief on a
long-distance kill.