I was fortunate enough to be drawn for both elk and deer for the fall 2013
hunting season. But I was unfortunate enough not to be able to put
a tag on either critter. And since I have a newsletter deadline upon me
with no other stories of fall hunt success yet submitted, well I guess that
I will write about some miscellaneous things that might be of interest to
my readers related to my fall hunt experiences.
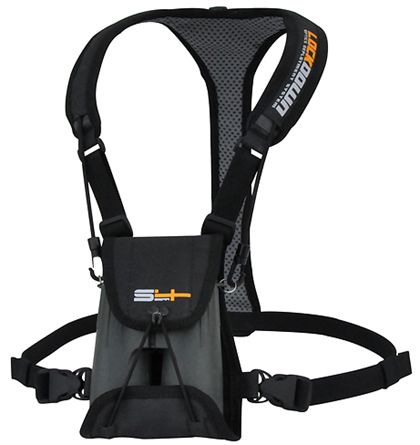
S4 Gear Lockdown Bino Harness
One of the things that I have struggled with over the years is how to carry
binoculars in the field. I absolutely hate hanging binoculars off my neck
with the typical strap supplied with most binoculars.
There are two major problems with that. First, if you are carrying something
like 10x42 binos, which seems to be the most popular size with a lot of
hunters, the constant weight on the back of your neck gets to be, well not
exactly painful, but at least very annoying.
Second, when you are working your way through the mountains, there may be
frequent occasions when you need to duck under low hanging branches, or
climb up a rock pile, or something. With just a neck strap, that bino is
swinging back and forth, dragging or knocking against the terrain.
And what about lens protection? You want to be able to glass something at
a moment’s notice, but if you have to constantly be ripping off and then
replacing lens covers … well that gets to be a hassle as well.
My solution in the past has been first, to downsize my binos. Instead of
10x42s, first I went to 8x32s, then more recently I picked up a set of
Pentax 9x28s. With smaller binos, those can be carried in a belt pouch
instead of hung around your neck.
Everything in life is a compromise. With smaller binos you sacrifice light
gathering ability. I really didn’t give up too much optical quality though,
within my optics budget. Both of my downsized binos are Pentax. The 8x32s
in particular are about the sharpest binos that I have ever looked through.
The problem I ran into though, is how do you wear your binos in a belt pouch
when your daypack has a sturdy, supportive waist belt that has no way to
attach a belt pouch? That is the case for the Eberlestock X2 hunting pack
that I recently wrote up a gear review on.
So almost as an afterthought, a little over a week before my first fall
hunt, I placed an order at Midway USA for an interesting looking binocular
harness while I was actually browsing and looking to buy something else.
It’s made by a company named S4 Gear. S4’s fancy name for it is the
Lockdown Optics Deployment System.
Here’s what is interesting about this particular binocular harness system:
When “locked down,” your binos are held tight to your body. They don’t
swing or bounce around. The lenses are protected from dirt and leaves if
your are scrambling around in scabby terrain. When you need to use the
binos, you release a single elastic cord, then pull the binos downward,
then out and up to your eyes in one quick and easy motion. I’m not sure
what to call the not-a-pouch (so I’ll use that term) where the binoculars
are stored in lockdown. You need to look at the picture to understand
what is going on.
At the top of the not-a-pouch is a flap that is made rigid by an internal
piece of aluminum sheet. The bottom flap is not aluminum reinforced and
remains soft. An adjustable elastic cord from the bottom flap hooks to a
catch-hook on the top flap to enclose the binoculars and lock them in.
There are two other elastic cords, again adjustable for length, that come
through tunnels in the shoulder yoke of the harness, and then attach to
the neck strap anchor points on the binoculars. So to deploy the binos
for use, you pull downward against the elastic cords attached to the
binos, then outward once the ocular lenses clear the aluminum reinforced
top flap.
While glassing, there is no tension that you must fight from any part of
the optics harness. Yet, if you wanted to, you could let go of the binos
where they would dangle from the harness similar to how they would dangle
from a simple neck strap, except that the weight is supported more by
your shoulders than against the back of your neck.
Putting on or taking off the harness is easy. Basically you put it over
your head, then reach around to the middle of your back to grab the two
elastic side straps. You bring each side strap around to the front,
where it clips in with a fast buckle to the body of the not-a-pouch.
That’s it.
The harness does not interfere in the least with a backpack. If your
pack has a sternum strap, all you have to do is make sure that you
buckle the sternum strap underneath the straps of the bino harness.
The S4 Lockdown comes in two sizes. The smaller one is supposed to
accommodate binos from 4˝ to 6 inches in length, while the larger
version accommodates binos from 6 to 7˝ inches in length. Both
versions are available in basic black and in camo. Cost was about
$40 on the MidwayUSA site for the small version in black, which is
perfect for my 8x32s.
S4 also has another version called the Lockdown X. Instead of a
strap that goes straight down the middle of your back, the back of
the harness is shaped in an X pattern. This version is a bit more
expensive than the basic Lockdown, and I don’t know what its
advantage is supposed to be. The Lockdown X comes in only one
size to fit binos from 5ľ to 7˝ inches in length, and it also comes
in black or Realtree APG camo.
Shooter Smart Phone App
When my work buddy Brad came strolling into the office one day showing
off his new Motorola Droid RAZR smart phone, I started drooling. I got
my first smart phone several years ago, but compared to the Droid, my
old phone was absolutely dumb. Mine used the old Windows Mobile
operating system, an operating system that never caught fire and for
which very few third party apps were ever built.
I knew that since the Google Android operating system came out, that
it really started to give the Apple iPhone a run for its money in the
smart phone market. I knew that plenty of apps were out there for
Android.
Brad showed me a cool topo mapping application that he uses to navigate
the backcountry on his Yamaha Rhino. Most of the latest generation of
smart phones have built-in GPS functionality. These new smart “phones”
are so much more than simply a phone. They are actually very powerful
small portable computers. The phone function of these devices is
almost just one other thing that they happen to do. It was obvious to
me that it was time to dump my old phone and get one of these nifty
gadgets.
One of the main drivers for me was that I knew that there were ballistic
programs out there for smart phones. What I didn’t know was just how
sophisticated these ballistic programs had become.
After looking at a few of the free ones, I settled on Shooter,
which is not free. The cost is $10, but once you see all that it can do,
you realize that the app is well worth the small cost.
After downloading the program and starting it up for the first time,
your reaction is “huh?” All you see is a mostly blank screen with
little indication of how you’re supposed to get the program to work.
You might think that the program is somehow incompatible with your
device and that something is screwed up and not working.
Rest assured that is not the case. If you look closely at the top of
the first screen you will see a circled-plus symbol. The first thing
that you need to do is ADD one or more firearms – that’s what the
circled-plus symbol allows you to do.
Once you have at least one firearm defined – it asks for things like
barrel twist, sight height above bore, elevation and windage units of
your sight, then you need to add loads for each firearm.
This is where you tell it things like bullet diameter, weight, ballistic
coefficient, and muzzle velocity. To make inputting bullet data easier,
you can choose a particular bullet from a large bullet library. But if
your bullet somehow is not there, you can enter the bullet parameters
manually.
Then you give it information about your zero, such as the zero range,
zero height (for example if you zeroed 1.75” high at a distance of 100
yards), altitude where zeroed, temperature, humidity, and pressure
where zeroed. It will have default values for many of these parameters,
so you don’t need to know every single piece of data, but of course,
the more accurate your inputs, the better will be the firing solution
that it can calculate for you.
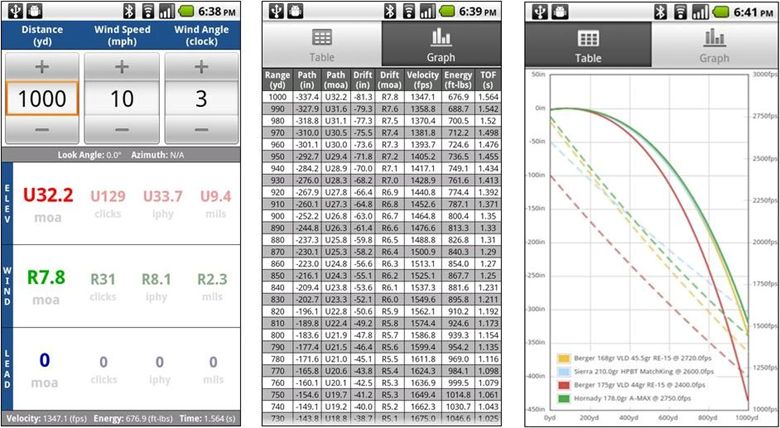
The three screen shots above are examples of the kind of data that it
will calculate for you once you set up firearms and loads. Now here’s
the cool thing about what it can do for you in calculating a firing
solution in the field: Because it runs on a smart phone, the program
can determine your current altitude, temperature and atmospheric
pressure, and even angle to the target from the resources available to
the smart phone!
The altitude it gets from knowing your GPS location. It gets
temperature and atmospheric pressure by going on the internet and
checking with the nearest weather station to your current GPS location
(not perfect, as the nearest station may be many miles away). Target
angle it gets from the tilt sensor that is built into most recent
smart phones. All you need to do is point your phone in a line to
your target and hit the button to tell it to acquire the angle.
So what this means is that even though you may have zeroed your rifle
at an altitude of 2000 feet in the middle of summer at a temperature
of 105°, now that you are hunting at an elevation of 8500 feet in
November at a temperature of 45°, it will take all that into account
when you tell it that your target is at a range of 367 yards, and that
the wind is 12 mph out of the northeast. If you have a Kestrel wind
meter with Bluetooth interface, it can get the wind data directly from
the Kestrel. Whoa!
As shown in the leftmost screenshot picture, Shooter’s output will
tell you how high and how left/right to hold in MOA. That is assuming
that when you setup your firearm, you told it that your sight units was
MOA. Notice that it can also give you the hold in mils, clicks, and
inches per hundred yards (IPHY). The primary unit is the one that you
setup for your sight units in the firearm setup screen.
Of course the big question when you are hunting is whether you will
actually have the time to be fiddling around with your smart phone and
other instruments when an animal shows up. Probably not!
Nevertheless, this can be a very useful tool to help you pre-calculate
your ballistics to gain familiarity with your trajectory and windage
during all that time that you are sitting and waiting for a critter to
show up.
Read all about Shooter at
http://www.shooterapp.net/.
Ballistic Drop with a Duplex Scope Reticle
Ok, so now let me give you a practical application for Shooter in
the field – an application that does not require fiddling around
with your phone at the moment of truth.
In 2010, I was drawn for my first-ever bull elk tag. To celebrate,
I went out and bought myself a new bull elk rifle. Oh sure, one or
another of my .30-06s would have been plenty adequate, but you know
how it is – any excuse to buy a new rifle!
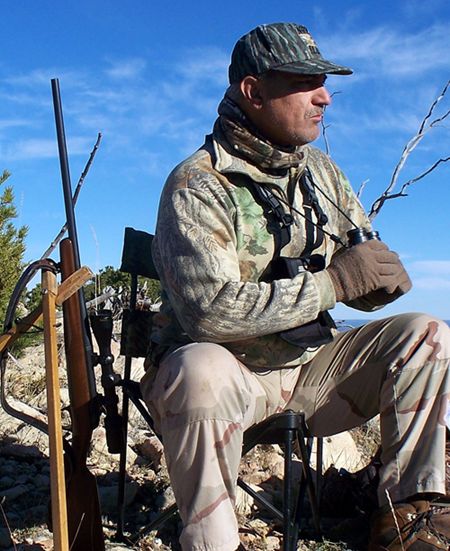
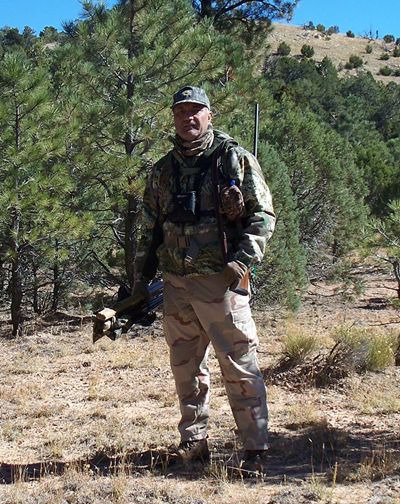
I picked up a Browning X-Bolt Hunter in .325 Winchester Short Magnum.
Now that ought to do the job! It is the rifle pictured propped up
next to me in the lead photo for this article.
Well since you didn’t hear the story of how I tagged my first bull
elk, you can correctly surmise that it didn’t happen in 2010.
In 2013, I was drawn for my next elk tag, for cow elk. Since the
X-Bolt was still unblooded, that was the rifle I chose for my cow
elk hunt, even though an aught-six would have been a fine choice
for cow.
When I bought the X-Bolt, I chose a 3-9x40 Browning scope for it.
The word on the ‘net is that it is really a rebranded Bushnell.
It's supposed to have 4200 glass, but without the RainGuard coating.
It has a duplex reticle.
After the bull hunt, I took the scope off the rifle and
half-heartedly tried to sell it. I wanted to replace it with
another good quality scope that had a reticle with ballistic drop
dots. Well that never happened.
So for the last three years, the X has been sitting in the gun safe
scopeless, and the Browning scope has been packed away on a shelf
in its original box. But now that the cow hunt was coming up, the
scope and the rifle were rejoined. I figured that cow was easy –
that I should be able to get within point blank range of a cow and
wouldn’t have to worry too much about ballistic drop.
The .325 WSM is a formidable round. It is actually an 8mm bullet
(.323”) on the WSM case. Though advertised to achieve 2900 fps with
a 200 grain bullet, in my hand loading experiments I was easily
crossing the 2800 fps mark, but not really approaching 2900 in the
X-Bolt’s 23” barrel. I was using the 200 grain Nosler AccuBond.
Nevertheless, that is still strong medicine.
For the cow hunt, I chose to dial down the power a bit. I ended up
with a load that fired the 180 grain Barnes Triple Shock X-bullet at
2792 fps. Furthermore, this data was gathered on a 72° day at the
new Chino Valley shooting range which sits at an altitude of 4,770
feet. The range is 100 yards long, and I zeroed about 2Ľ inches high.
In light of the preceding discussion, you may recognize why this data
is relevant.
I was hunting Unit 7 north of Flagstaff. I found a nice high ridge
to sit with great views. My sit spot was at an altitude of 7,450
feet. From that spot, I had fields of fire from a little less than
200 yards to as far as I would dare to shoot. But really, how far
could I shoot with just a duplex reticle? That’s the question that
came to me during my long hours of observation from that spot.
I noticed that this scope seemed to have a particularly tight duplex
distance. By that I mean the distance from the center intersection
of the fine wires to the points of the fat wires. But what exactly,
was this distance in MOA or IPHY?
A couple years back I had mounted a 3-9x40mm Weaver scope on my .260
A-Bolt. This scope has ballistic drop dots on the reticle. But
nowhere in the scope’s documentation were the measurements of the
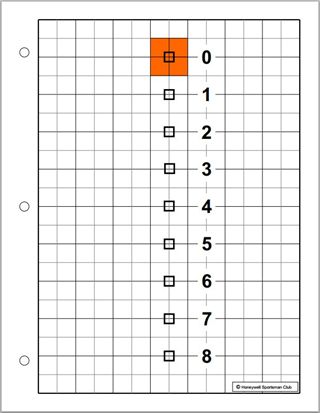
drop dots mentioned. It was up to me to figure it out. I created
a sort of target to make the measurements. It is posted on our club’s
website where you can download a copy. It looks like this

The idea is that you set up this “target” (not meant to be shot) at
exactly 100 yards. You place the center crosshair on the orange square,
then read the scale below to find out where your ballistic drop dots fall.
For the Weaver, I determined that the drop dots fell at 2.0, 4.5, and 7.5
IPHY below the center crosswire intersection.
So why shouldn’t this work with a simple duplex reticle? You won’t
have multiple aim points, but it should be easy enough to eyeball the
halfway point between the lower duplex point and the center crosshair,
giving you at least two drop points. Right?
So the day that this thought came to me, I came down from my high overlook
to head back to camp for lunch. After eating, I set up a target frame at
100 yards from my rested rifle and performed this test. In case you are
wondering, ever since an unfortunate incident during a hunt many years ago,
where I found that I needed to double check the zero on my rifle, I always
take a target frame and extra targets on hunts with me. And one of the
extra targets that I happened to have on hand was the reticle measuring
target.
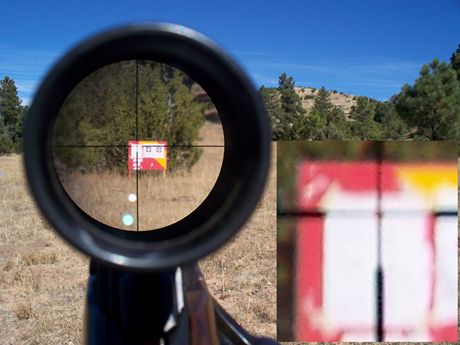
|
At right is a photo I took through the scope. I know that it is blurry and
that it is impossible to see the drop numbers, but if you look at the clear
drawing of the target above, then look at where the lower duplex point hits in
the blurry photo, it looks like the duplex point hits pretty much in the
dead center of the target, which correlates to 4 inches of drop at 100 yards.
If you look at the horizontal bar and assume that the horizontal duplex
distance is the same as the vertical duplex distance, you can see that the
total width of the skinny horizontal bar seems to be the width of the paper,
which we know is 8˝”. So let’s call it 4.0 IPHY.
So now it’s time to enter all the pertinent data into Shooter on the smart
phone. After setting up the rifle, the load, the conditions when zeroed,
we next enter the parameters for the shot. I set the range at 500 yards,
and manually entered a 0° look angle. I asked the app to pull in the
local environmental data. It came up with a density altitude of 8,184
feet and a temperature of 48.2° F. Just so that it would also calculate
windage for a 10 mph breeze, I manually entered a wind speed of 10 mph
from a 90° angle.
But the piece of data that I really wanted to know, was what distance
correlated to 4.0 IPHY of drop – and secondarily, what distance correlated
to half the duplex distance of 2.0 IPHY, which could be easily eyeballed
when looking through the scope.
By flipping over to the ballistic table screen, I found that 4.1 IPHY
correlated to 370 yards. 360 yards correlated to 3.8 IPHY. So let’s
call the lower duplex point for 370 yards. That’s a pretty long poke
and far enough to be satisfied for a maximum range to attempt.
Consulting the table again for the halfway measurement of 2.0 IPHY, I
found that 2.1 IPHY correlated to 300 yards. 290 yards correlated to
1.8 IPHY. For the sake of simplicity, let’s call the halfway aim point
for 300 yards.
The table also revealed that the max rise of the trajectory was 2.5
inches at a range of 130 yards. The bullet would fall 2.5 inches low
at 260 yards. Therefore I could feel comfortable with a dead center
hold basically from 0 to 260 yards. Beyond that I might start raising
my hold. So there you have it. That’s how you turn a simple duplex
reticle into a ballistic reticle.
Non-Matching Camo
There are so many camo patterns out there in the market today. Coming
up with new camo patterns seems to be a huge business. It’s very much
like the fashion business. The pattern that was hot last year is not
so hot this year when makers bring out that great new gotta-have-it
pattern for the new season. So whether your old camo clothing has worn
out or not, there’s always great temptation to pick up something new in
this season’s hot new pattern.
I guess that I must admit that I have not been totally immune to this
marketing ploy, but I sure try to stay as practical and rational as I
can.
In that light, let me talk about what I have settled on (for now!) as
my favorite hunting camo. It starts with a pair of military spec,
military pattern BDU pants. Nothing fancy there.
When I go to Cabela’s and check out the absolutely breathtaking prices
for the latest and greatest hunting patterns and fabrics, all I can do
is roll my eyes. Do people really pay that much money for a pair of
hunting pants? Some of the really expensive fabrics are very
lightweight and look to me like they would probably shred the first
time that they met a catclaw bush. Sheesh. Not for me. Just give me
good old mil-spec cotton BDUs.
The BDU camo pattern that I choose most often is the 3-color Desert
Camouflage Pattern, or DCP. According to Wikipedia, this pattern was
first issued in 1989 to replace the 6-color, “chocolate chip” desert
camouflage pattern. The three colors are dark brown, mint green, and
beige. This pattern today has been replaced by all the services by
the various new digital camouflage patterns.
On top I will choose a variety of other camo patterns. For desert
scrub I might use something like Cabela’s Seclusion Open Country, or
Mossy Oak Brush. In the forest I will use something with a darker
pattern, preferably with a good dose of green. Favorites are Realtree
All-Purpose Green, and Realtree Max-1.
The proximate photo is a real good illustration of why I go with
two different camo patterns on top and bottom. First, the two different
colors really help to break up the human silhouette. Second, notice how
the pants match the ground cover, while the jacket matches the tree
foliage. This works great whether you are standing or sitting. Your
legs are the ground, while your torso is a bush.
The Ranger Incident
The preceding items of miscellany might be filed under the heading of
“News You Could Use”. This next item is simply a story of something that
happened to me on my deer hunt. I’m not sure whether or not there are
any lessons to be learned from this, but it’s a good tale.
I was drawn for deer in Unit 29, the Chiracahua Mountains. This would
be my first trip down to the southeast corner of our state. The area
that I chose to hunt was Horseshoe Canyon, which is in the southeast
corner of the mountain range. In short, it’s waaay out there. I was
hunting solo.
My Polaris Ranger is an essential hunting tool. Not only does it allow
me to get way back in on some really rough trails, but it’s the best
way to haul game out of the backcountry as well. There is a rough
side trail from the main Horseshoe Canyon road up Blevins Draw. The
start of the trail was OK, just a couple of mild off-camber sections
to get past. But then the trail drops into the creek bottom which was
a mess of boulders and holes.
I parked the Ranger at the beginning of the couple-hundred yard rock
garden. I threw on my hunting pack and grabbed the rifle, setting off
for a hike. But as I walked, I was also mentally driving the Ranger
up the creek. Let's see, this part is passable, but that obstacle
right there would be a stopper ... unless ...
I leaned the rifle against a stump on the side of the trail and started
muscling rocks around. OK. Now the Ranger could get past that. I
continued walking, continued clearing obstacles. By the time I got
to the place where the trail exited the creek bottom, I decided that
yes! - I could drive through that now!
So I walked back to the Ranger, crawled the rocks successfully to the
exit of the rock garden, and proceeded on. The creek bottom rock crawl
is followed by a series of steep roller coaster hill climbs. As I
crested the last one, the Ranger issued a series of loud mechanical
BANGS and jerked each time. The sounds came from below and behind me
somewhere in the drivetrain. Then the Ranger lost the ability to move.
Oh oh.
I tried low range, I tried high range, I tried reverse. All I got was
what sounded like stripped gears. Did I just grenade my transmission?
The motor ran fine, but power was not making it to the wheels. I was
stuck.
How the heck am I going to get outta here? I just hung my head
contemplating the mess I was in. After about 10 minutes of despondence,
another thought came to me. Let me try diff-lock. And with that, I
was able to get the Ranger to move!
Let me explain the Ranger's 4WD system. 4WD is engaged electrically,
but what it does, is it engages the front wheels to pull only when
slippage is detected in the rear wheels. The front wheels engage and
disengage seamlessly as needed in 4WD, but the front wheels alone
cannot drive you out if the rear wheels are not driving. I usually
use 4WD with the rear differential in open mode.
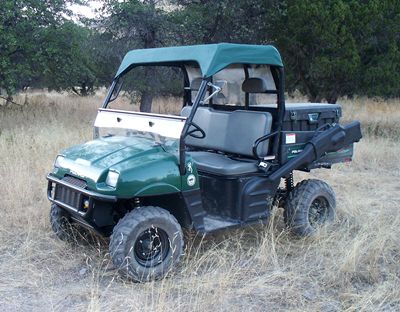
The Ranger safely back at camp. Whew!
|
Apparently what happened is that I spun the splines off one of the rear
axles. So in open-diff mode, all torque was being sent to the stripped
axle, meaning that I wasn't going anywhere. Putting it in diff-lock
mechanically locks both axles to the drive shaft, which allowed the
other axle, which was still good, to drive. Right on!
Now that I had heart that there was a good chance that I could drive
out of Blevins Draw, I decided to park the Ranger right there and
continue my day’s hunt on foot. At the end of the day I was indeed
able to drive back through the roller coaster hill climbs, back through
the rock garden, back past the off-camber sections, and back to camp.
Whew! Talk about dodging a bullet …
© Honeywell Sportsman Club. All rights reserved.