Much like airplanes, there aren’t many – if any
guns that I don’t like. There has always been a special
interest for me in the guns of the old West and being a fan
of western movies, the lever gun has always been a favorite
of mine. I remember when we got a new Marlin 39A when I was
about 10 years old. It felt slightly heavy, but solid and
the accuracy excellent. I was hooked.
A couple of years ago I got the got the urge to see what was
available in centerfire lever guns. A friend at work mentioned
that he liked the 45-70 and that he liked the Marlin lever guns
because they were easier to take apart to clean than the
Winchesters. He also indicated that the 45-70 was good for
long range shooting – who can forget the memorable long range
shooting in Quigley Down Under with the 45-70’s big brother, the
45-110.
I started doing some research which included reading the story
Dan Martinez wrote about the .444
Marlin. I considered the available calibers and manufacturers
and decided on going with the traditional 45-70, partly because I
like to see that old stuff, designed long ago, still out there
doing a respectable job. There are three pressure levels of loads
out there for the 45-70. The lowest is for the original Trapdoor
Springfield. Medium loads are for Modern Marlins and the Hot loads
are for the Ruger No. 1. My solution to this dilemma is to only
use and keep the low pressure loads, which are similar to the
original - 405 grain, 1350 fps muzzle velocity. This load is easily
handled by the modern Marlin and the recoil isn’t as bad as the
Medium loads. Ballistics for Remington factory loads indicate 1330
ft/s muzzle velocity for 405 grain Jacked Soft Points. At 500 yards
this is still going 869 ft/s. This means at 500 yds, it has 175%
of the muzzle momentum of a 45 ACP! Or compared at 500 yards to a
.30-06 150 grain bullet, the 45-70 has approximately 50% more
momentum. OK - yes there is a slight downside – if you’ve got it
sighted in at 100 yards, you just have to aim 25 feet high at 500
meters to be right on target!
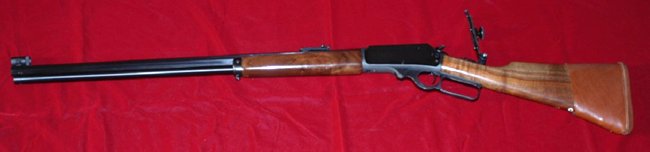
A few months later, I was frequenting one of my local gun store
hangouts and noticed a Marlin Model 1895 45-70 on the used gun rack.
I looked it over and decided to wait and see what else was available.
It looked to be in pretty good shape and hadn’t been shot much –
maybe a couple of boxes of ammo at most. The next week I did some
more research and decided on a price I was willing to pay if it was
still there. It was, the price was right and I headed home with the
new addition to the family.
All was well until the first time I tried to feed some ammo through
it and managed to get the action all jammed up. Well, no better
reason than having a couple of cartridges wedged in the action to
take it all apart and figure out how everything works. Since my
experience with Marlins was shooting only, I had never had one apart.
Once the action was cleared out, I couldn’t help but notice that I
ended up with three cartridges – one more than I had put into it.
Never before owning a gun that makes it’s own ammo, I was quite
pleased for a while – considering the price of factory 45-70 ammo.
About that time I noticed a clunking sound from the magazine tube as
the muzzle was raised and lowered, although nothing was feeding into
the receiver. Time to take more stuff apart.
What I discovered is that the previous owner and self appointed
gunsmith had installed a front sling swivel mount into the wooden
forearm which involved drilling and installing the swivel screw right
through one side of the magazine tube – apparently when it was full
of cartridges, which captured several cartridges above the screw and
had somehow wedged at least one cartridge so that it could come loose
and gravity feed into the receiver.
Wow! What a potential recipe for disaster. Another reason to ALWAYS
double check to make sure that the chamber is really empty when the
bolt closes on a gun you think is empty. Luckily nobody that handled
the gun had the misfortune of a cartridge coming loose, cycling the
lever with the muzzle up and pulling the trigger on a gun that on
inspection appeared to be empty.
Marlin was very helpful when I called them. With one quick phone call,
I had a new magazine tube and a new forend tip with sling swivel on their
way and found out that they use an electrostatically applied Lacquer
finish on the Black Walnut stock.
A quick look through my scrap hardwood stash revealed a piece of Walnut
about the same grain and color as the forend. Soon a plug was cut and
installed, a couple new coats of lacquer applied and the new magazine
tube and forend tip installed.
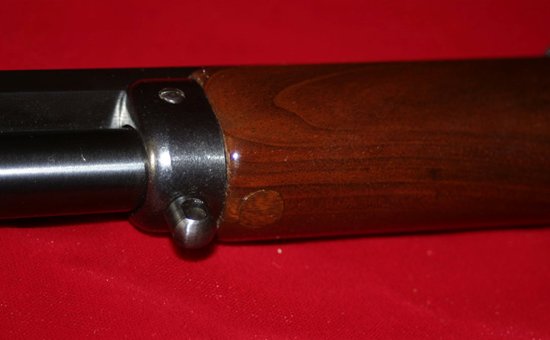
"Custom work" repair
A trip to the range showed promise in the accuracy department, although
the stock sights are not meant for precision. It also showed that even
with the fairly mild Remington factory ammo was not much fun to shoot
off the bench. The fairly light 7-1/2 pounds doesn’t do much to tame
the recoil.
During later disassembly I noticed that the stock was cracking at the
rear of the tang. Checking the fit of the tang to the stock, I found
that the rounded steel was pressing against the wood, which acts like a
wedge, causing it to split. Looking at the forward shoulders of the
buttstock where it meets the receiver, I could clearly see the impression
of the metal in the wood – about .020”. Also one of the ears that
projects into the receiver was cracked and almost completely loose from
the rest of the stock.
I’ve also seen an almost identical condition in a brand new 18” barrel
1895G Guide Gun. Either the shoulder wood compresses or the wood dries
and shrinks, or both, causing insufficient clearance behind the rear of
the tang.
While working with some clear Devcon epoxy to repair another stock, I had
left a pellet of epoxy about ½” long in a syringe used to inject it into
holes drilled in the wood. I took the cylinder of epoxy and measured it
with calipers to determine the diameter. I placed it on a vice anvil and
hit it with a hammer blow hard enough to put a permanent dent into walnut,
then re-measured. The diameter did not change which indicated that the
epoxy had the ability to absorb a large amount of shock and spring back.
If placed between the stock and receiver, it might prevent the stock from
further compression.
There was also quite a bit of clearance between the top and bottom tangs and
the stock. Once the broken ear was fixed, I started at the back of the tang
recess in the stock, coating the tangs with dry Teflon spray as a mold release,
then coating the wood sparingly and sliding the stock in place and letting the
epoxy set up. The rearmost part was done without tightening the tang screw so
it would fit tightly and with about .030” between the stock shoulders and the
receiver so there would be room for a layer of epoxy bedding where most of the
recoil transfers from the receiver to the stock. Epoxy behind the curved areas
of the tang was removed before it completely set up since clearance is required
in these areas. Special care was taken on each part of the bedding to keep the
epoxy out of the action and off the finished areas of the stock by masking or
the use of mold release.
The stock now fits snugly into the receiver, and even takes a firm pull to remove
it during disassembly. The tang screw snugs up quickly without the extra half
turn to bend the tangs together that it needed prior to bedding.
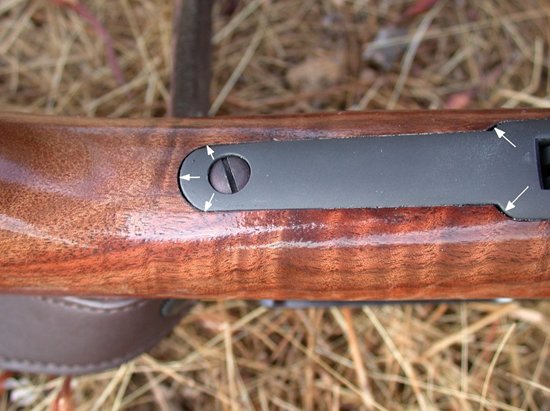
Areas where clearance is required to prevent splitting stock
on top and bottom. Without gap, location at arrows at right
will wedge stock sides apart from recoil, which causes ears
to split and separate from stock. A piece of paper can be
inserted all the way around the curved areas.
A couple of replacement sights were considered. However, neither the Lyman nor
the Marble’s tang sights had enough vertical adjustment to get to 500 meters.
Next, a Smith Enterprise flip up ladder sight was installed in the barrel rear
dovetail and another accuracy test done – even though the front sight covered a
3 foot circle at 200 yards, I made a couple of 4” groups off the bench.. The main
drawback to this sight is that the vertical adjustment is very coarse. Each
increment is about 12” at 200 yards.
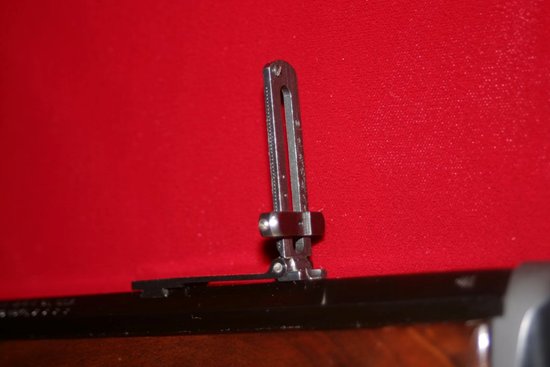
Smith ladder sight extended
Since my objective was to use this rifle to shoot silhouettes at up to 500 meters,
better sights would be required. I started a search for a tang type sight but
could not find any with bases that would accommodate the bolt on the Marlin. When
the bolt is all the way back it reaches almost the rear of the upper tang. After
about a year I had just about given up and was thinking about buying a Vernier type
ladder sight and making a base for it. While surfing the internet, I stumbled
across the website for Montana Vintage Arms – and they had a sight and base for the
1895 Marlin.
The Marlin dovetail for the front sight is only about 3/8” from the muzzle. Looking
at the photos online, a search was on for a globe sight with a short overhang. I
found a globe front sight sold by Buffalo Arms. This was a Shaver sight for a 3/8”
dovetail with interchangeable inserts and internal spirit level to prevent canting
the rifle which is important for accuracy with the high arc of the 45-70. A couple
of mouse clicks and a couple of days later and new toys were waiting for me at the
front door. The MVA rear sight is calibrated in .01” increments. With a 33-3/4”
sight radius, each increment is 1 Minute of Angle. Horizontal adjustment is
calibrated in 2 MOA increments and you’ll need a magnifying glass to see them, but
you can adjust to 1 MOA if desired.
Luckily, I did some measuring and fitting before drilling and tapping. It turned
out that the rear sight base was for a Winchester, but it was very similar in
appearance to the Marlin base. A quick call to MVA and the correct base was on
its way. The people at MVA were very helpful and said I could return the base
after I received the replacement.
Installing the base was a standard drill and tap job – until I realized that the
tang was tapered and could not be clamped into a vice with parallel jaws. After a
little head scratching and resisting the temptation to drill and tap by hand since
the screw head clearance is only a couple of thousandths, I had a solution. A
couple of 123 blocks – called that because they are 1” x 2” x 3”, they have lots
of holes and can be used as spacers. The tang angle was so slight that bolts could
be put through the 1” thickness of the blocks and tightened without bending the
bolts. Two more bolts to clamp the blocks to the milling table, a little alignment
and we were back to the job at hand.
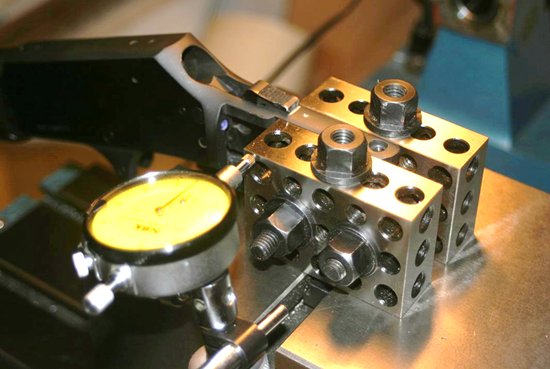
Compensating for tang taper
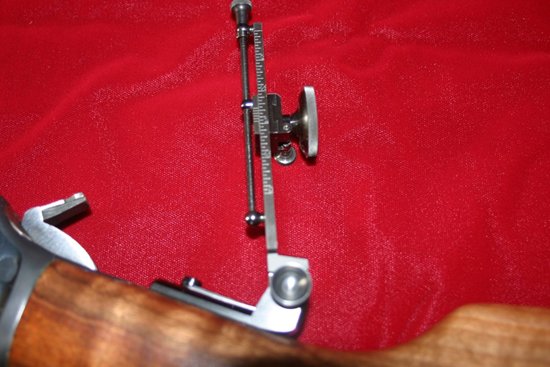
Montana Vintage Arms base and sight installed
The front sight installation went smoothly. Slow removal of metal from the bottom
of the sight dovetail with 400 grit silicon carbide paper, cleaning often, and
fitting. Once you get close, just a couple of ten thousandths determines whether
you have a good fit in the dovetail or a bad one.
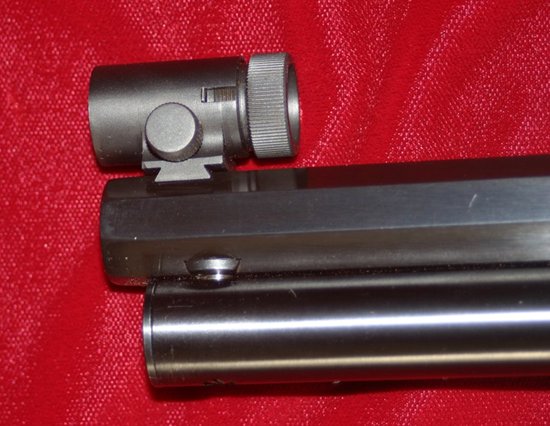
Front sight installed
The sight installation was complete two days before the Centerfire Rifle Silhouette
match, so the next day I made a quick trip to the range to see how everything would
work. I soon found that when shooting from the bench it was difficult to keep enough
clearance to the rear sight eye cup to prevent it from hitting my glasses during
recoil. The ladder sight is spring loaded so it shouldn’t do any serious damage
(don’t shoot this one without glasses – you don’t want that sight cup in your eye!!!)
but repeated impacts will not do shooting glasses any good. A leather buttstock pad
gave an additional ½” which helped as long as the rifle was pulled very firmly into
the shoulder before firing.
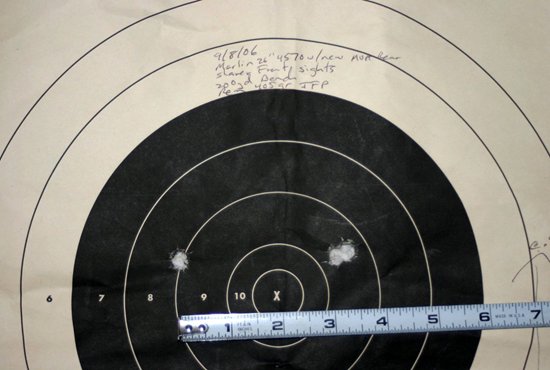
Limited sight in time allowed one group at 200 yds
– this 3.25” group from the Bench.
Time was limited but I did get it zeroed at 200 yards, then fired a three shot group.
The first two were touching and unfortunately, I repositioned before the third shot,
which was the same height as the other two but hit way to the left. Probably mostly
shooter error. From my previous experience and the sight picture improvement, I
think it will shoot 2” groups at 200 yards. I also found that the rear sight was
canted about 1.5 degrees to the right which would have to remain until after the
match – I would just have to hold the rear sight vertical rather than center the
level in the front sight.
Unfortunately, on the day of the match, just as we started practice, a gust front
came along with enough wind to push the 405 grain bullets 6-8 feet at 500 meters,
followed by a heavy rain. The match was cancelled. The rear sight has now been
shimmed on the right side so it is vertical and ready for another sight in session
followed by its first real shooting at 500 meters.
This was such an interesting project, maybe I’ll start looking for another lever
gun. These old calibers are continuing to grow on me. Perhaps a Marlin chambered
in 44-40.