
| Articles | Documents | Equipment | Events | Links | Membership | Miscellaneous | Scrapbook | Targets | What's New |
|
Gear Review:
LabRadar Doppler Chronograph | September 2021 | |||||
| Dan Martinez | ||||||
|
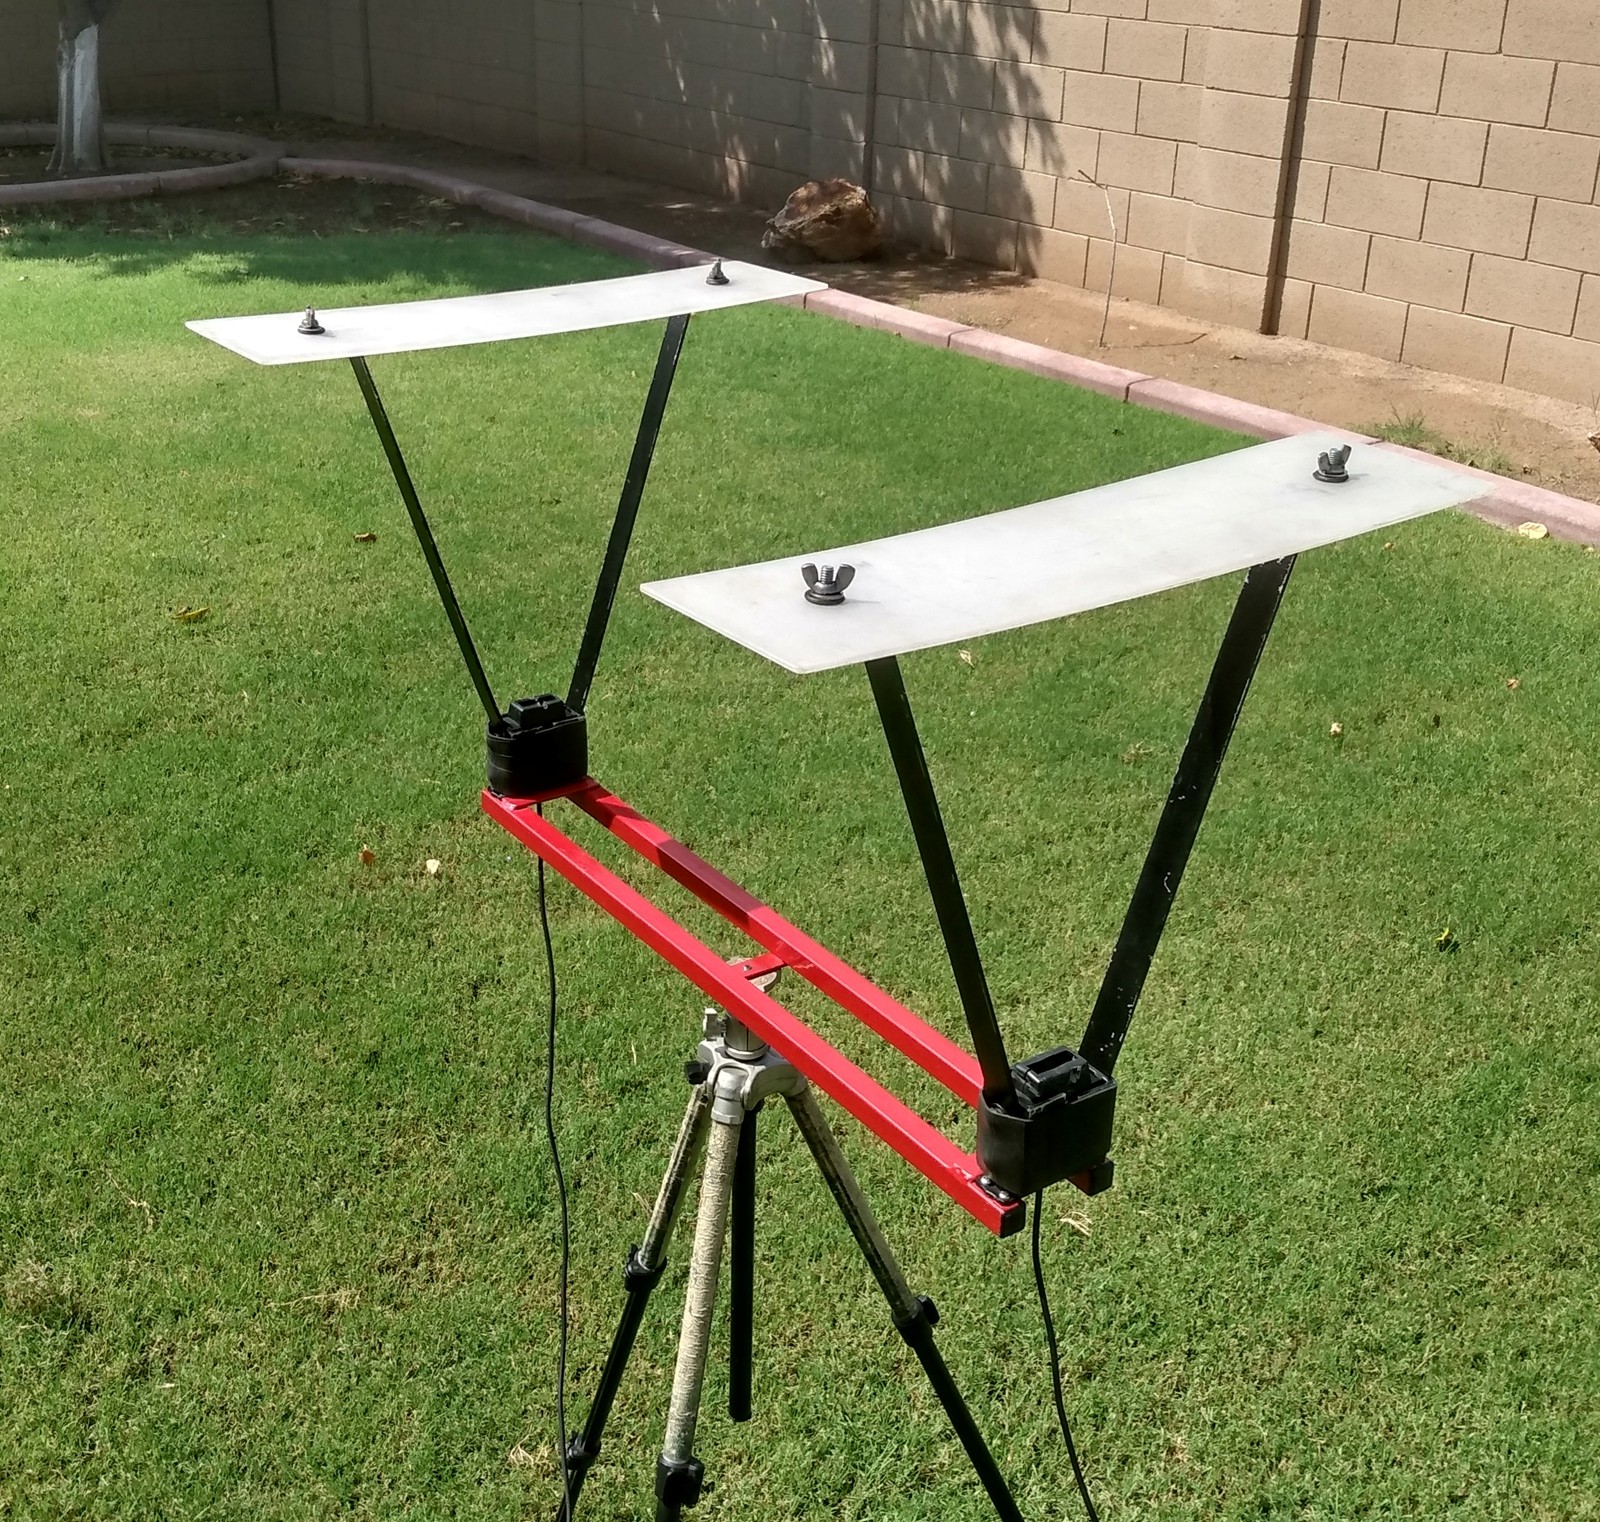
I had patched that thing back together a number of times. Early on, I had hit
one of the uprights that hold the sky screens over the light sensors. I had to
fabricate new uprights and new sky screens to make the unit operational again.
I had also put bullets through the black plastic housings that hold the light
sensors and their lenses. Thankfully, I did not hit the sensors or the lenses
themselves. I patched those holes in the plastic housings using JB Weld.
For a long time thereafter, I had no additional casualties. I thought that I
had figured it all out: How to set it up in line with the gun, how low, how
close to the sensors I could shoot. You always have to be aware of the height
difference between scope line-of-sight and bore.
I still had occasional failures to capture velocity, depending on lighting
conditions, but overall, I was pretty happy with it.
I finally decided that I was done with this chronograph about a year ago when I
was testing my 6.8 SPC AR-15 and once again put a bullet though the plastic
sensor housings. The best velocity measurement reliability comes when your
bullets pass closely over the sensors. But remember my comment about keeping
in-mind the difference between scope center and bore center? Well, an AR has
a larger gap between scope and bore than a regular bolt action sporter. Oops.
I first became aware of Doppler radar technology to measure bullet speed when
Hornady announced their new bullets made with “Heat Shield Technology” tips in
2015:
While analyzing the radar data on the new bullet, Hornady engineers noticed
something right away that was puzzling. In Drag Coefficient versus Mach (Cd vs
Mach) graphs, they saw that the new projectile was gaining drag shortly after
leaving the barrel, which affected the performance of that bullet for the rest of
its flight path. Simply put, the bullet acted like it had one particular BC for
the first 100 to 150 yards, then transitioned to a lower BC for the rest of its
flight path. Further testing was done with other bullets including BTHP match
and A-MAX® bullets. While the BTHP bullets Cd vs Mach charts looked as expected,
the A-MAX® bullets were showing the same increase in drag that the prototype
hunting bullet did. It was as if the bullet was changing shape in flight.
Further testing was done to confirm suspicions that the polymer tip was the
culprit. Aerodynamically efficient, high BC bullets at high velocity were
suffering from polymer tips softening and deforming in flight. Further testing
proved that it happens to all conventional polymer tipped bullets, regardless of
manufacturer.
“Impressive,” I thought, that they would apply such technology to measure bullet
speed. I was familiar with Doppler radar from my time in the military. I was an
Avionics Navigation Systems technician in the military where one of the systems I
repaired was airborne Doppler weather radar. Of course, a multi-million dollar
company like Hornady could afford something like this, but us humble home handloaders
could never expect to be able to use Doppler radar to measure our bullet speeds.
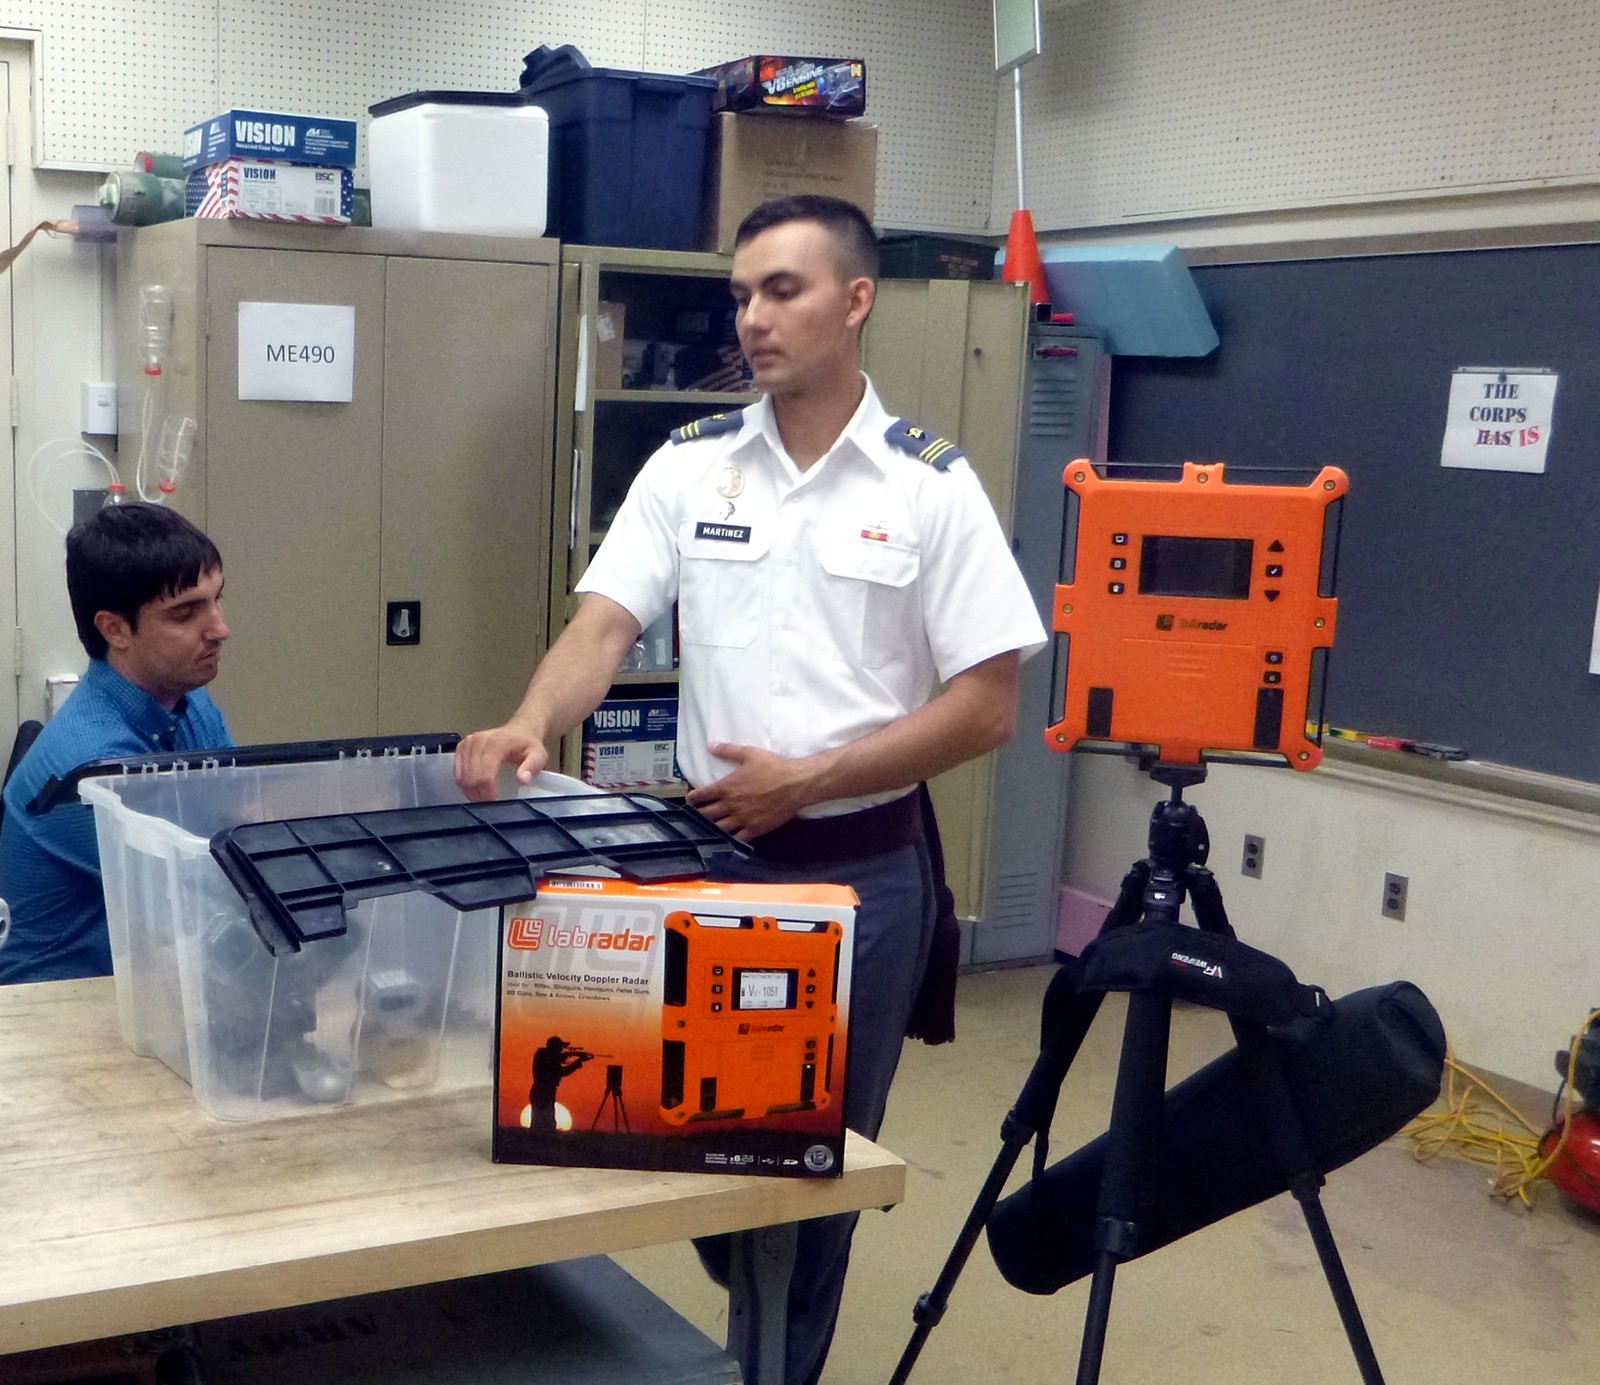
Of course, a multi-million dollar government outfit like West Point could afford
something like this, but us humble home handloaders could never expect to be able to
use Doppler radar to measure our bullet speeds. Right?
I did some digging and found that Hornady used a high-end 10 GHz Infinition model
BR-29015 Doppler ballistic radar to take their measurements. The packaging for the
one I saw at West Point seemed commercial off-the-shelf.
Since I had never heard of it, I researched the LabRadar when I got home from the West
Point visit. I found out that it was indeed available to regular Joes, and made by the
same company, Infinition, that makes Hornady’s radar, but it is consumer, rather than
professional grade. Still, the LabRadar is on the expensive side for a consumer
chronograph, with a cost of about $560. Yeah, that was a bit more than I wanted to
spend at the time, so I slugged along with my PACT for the next couple of years.
Last year, when I put another couple of holes through my old PACT, I was pushed over the
edge. Sure, I could have patched the PACT again, but I decided that it was finally time
to retire the PACT and get a LabRadar.
As I sometimes do when contemplating a relatively expensive purchase, I dropped a hint to
my family that I wouldn’t mind getting a LabRadar chronograph for my Christmas present
this year. With the cost divvied up between my two sons and my wife, the cost shouldn’t
be too big of a burden on any of them individually, plus they would know that they are
getting me something that I really wanted.
While the capability to measure a series of down-range velocities could be interesting,
I’m not a bullet manufacturer that needs to measure ballistic coefficients. I’m perfectly
content to accept whatever the manufacturer says when I need to plug B.C. into an exterior
ballistics calculator. The big draw for me was the far easier setup, and the fact that
the chronograph is completely out of any danger of being shot while in use.
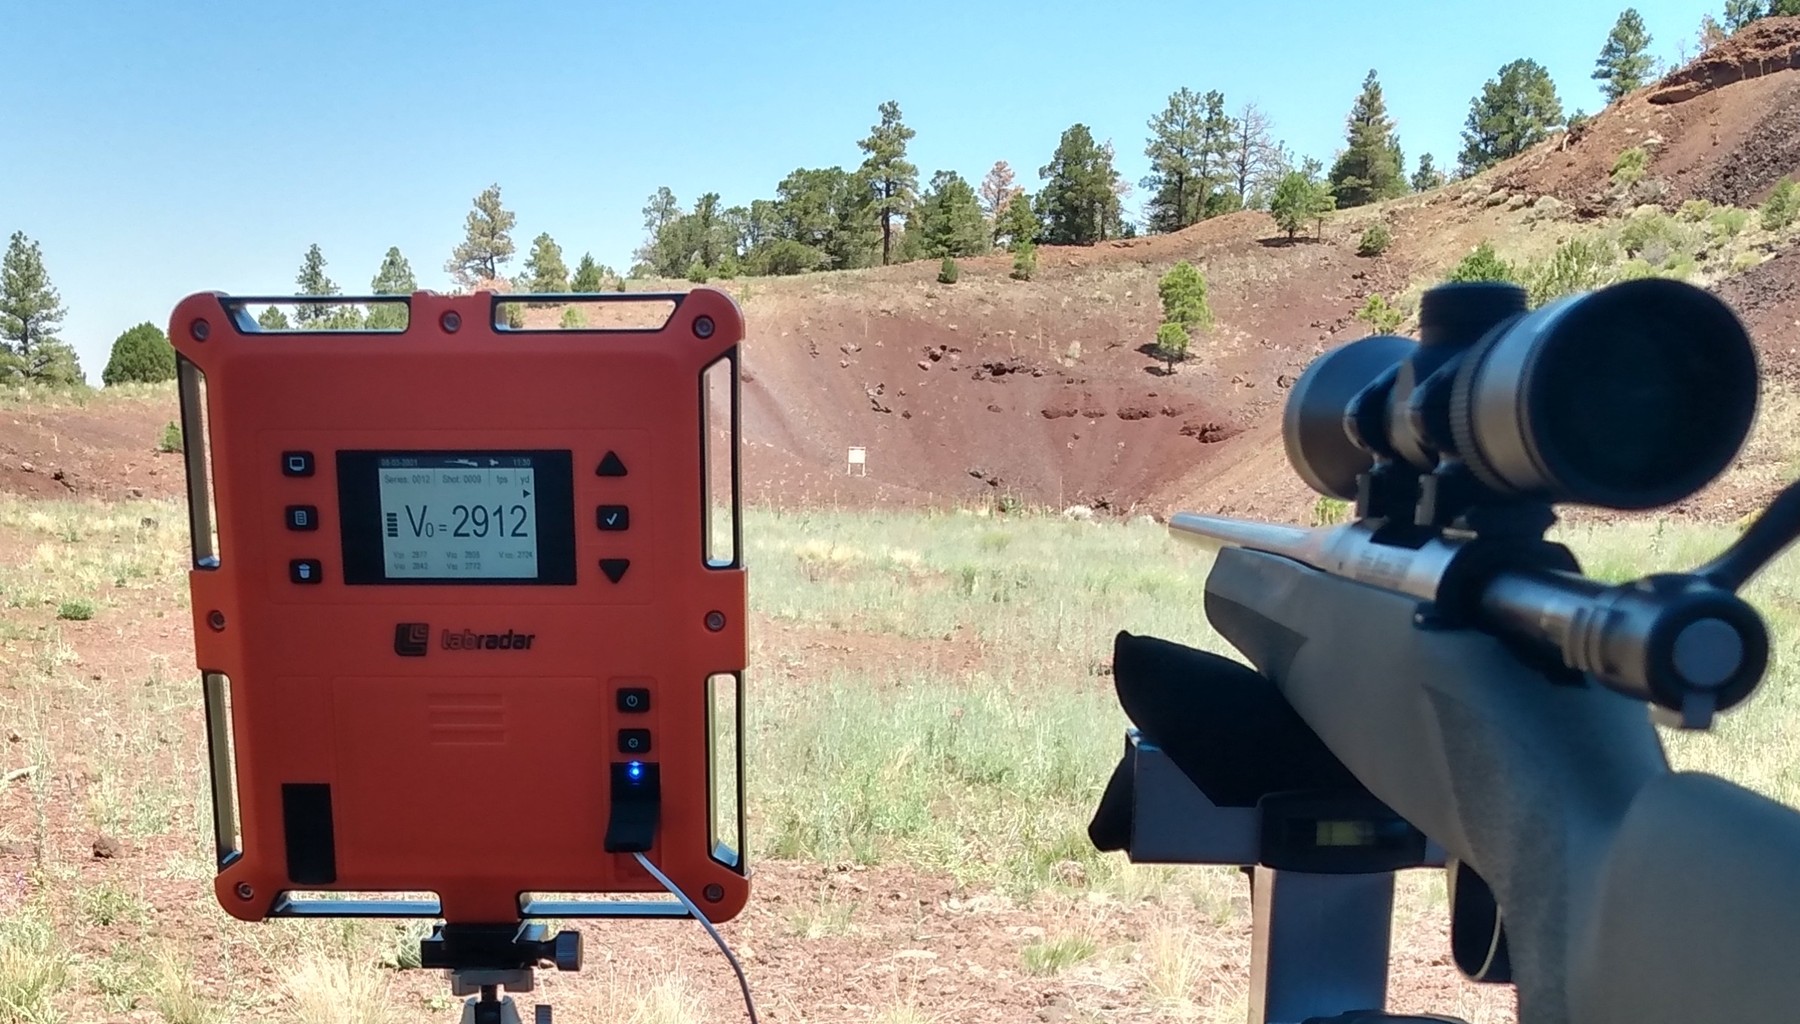
The front of the unit has a 3.4” diagonal backlit LCD display. Arranged around the display
are 6 rubber control buttons, plus there are two more rubber buttons near the lower right
corner of the front face.
There are two rubber flaps at the lower left and the lower right. The flap on the lower
left hides a slot for an SD card (SDHC cards are recommended, 32GB max). The flap on the
lower right hides a micro USB port plus a 1/8” audio jack. This jack is for use only
with LabRadar specific external triggering devices. Directly above this flap is a staus
LED. It is blue when the unit is powered on, and orange when it is actually transmitting
a radar signal.
In between the two rubber flaps at center bottom is a battery compartment that takes 6
AA batteries. Alternatively, the unit may be powered through the USB port with a
rechargeable USB battery. That is what I do instead of burning through disposable
batteries.
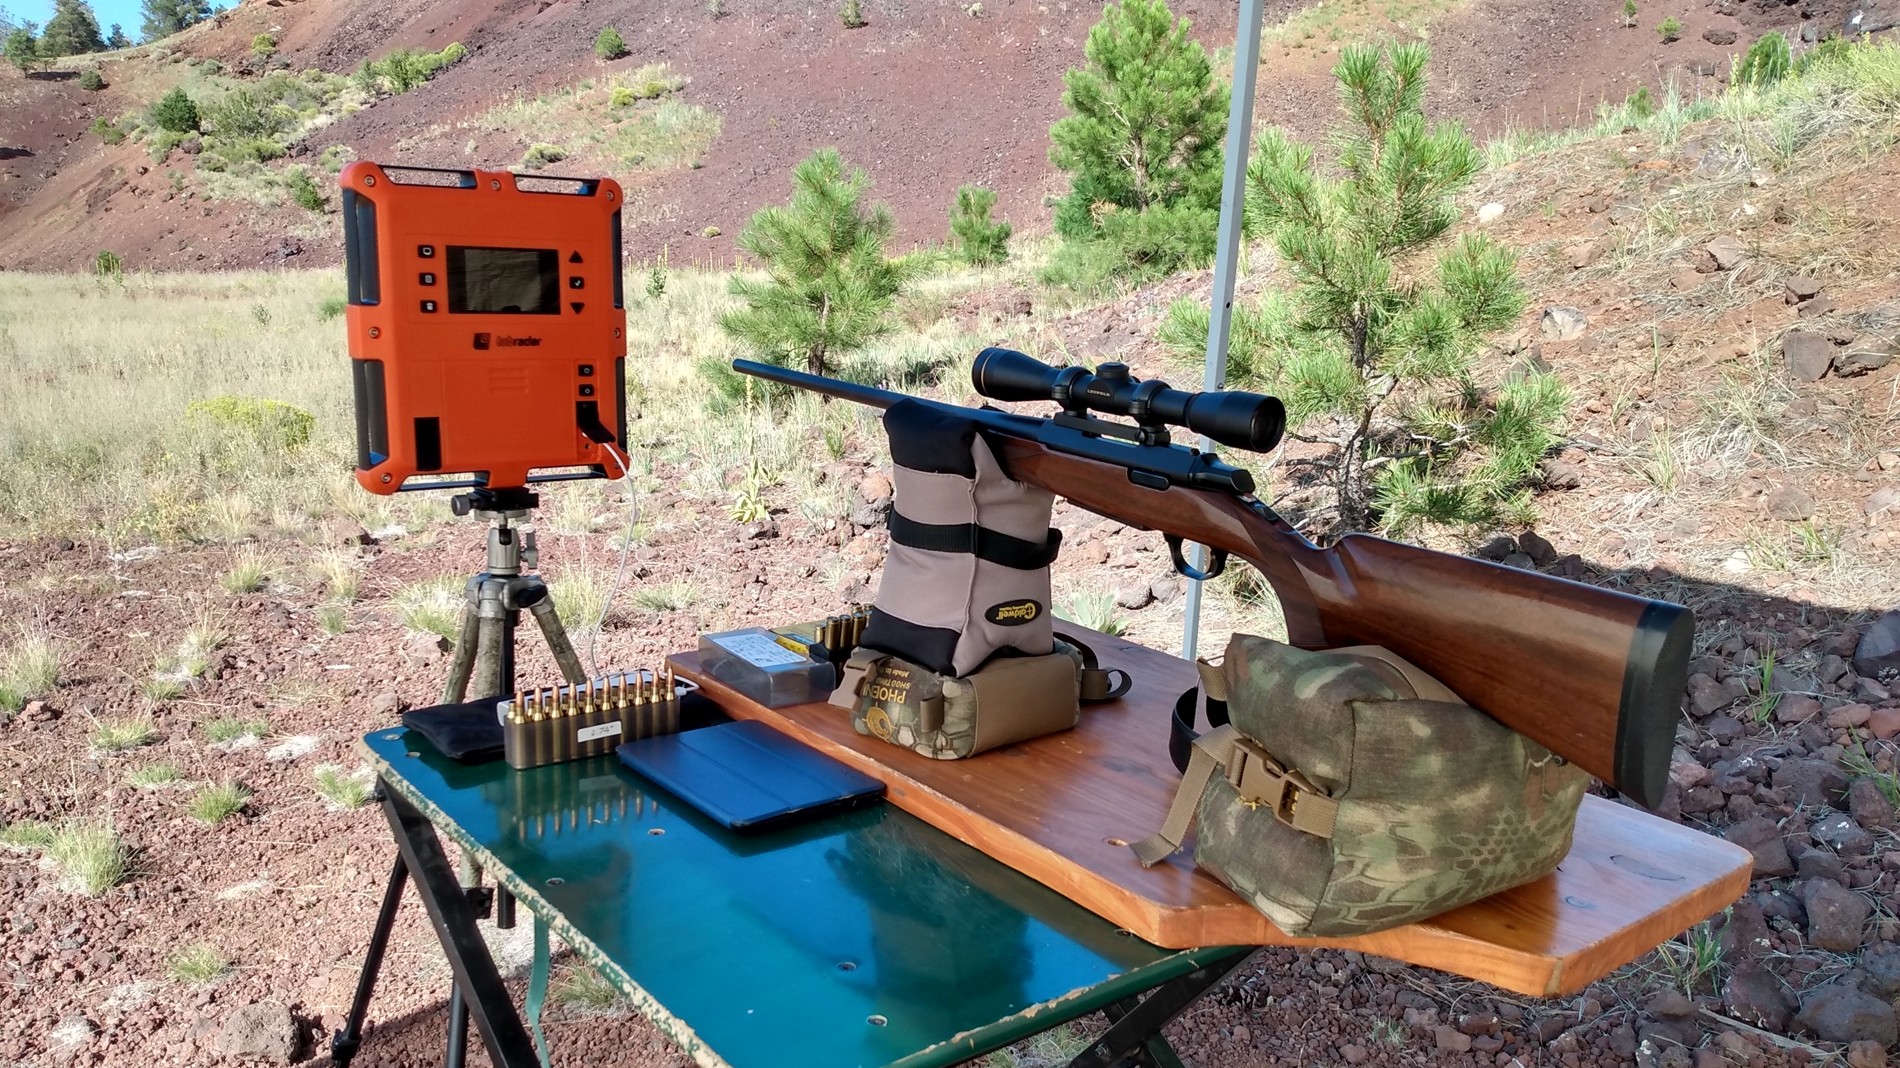
Setup for use is so much easier than with my PACT. I set it up on a tripod directly
in front of my shooting bench. I adjust the tripod vertically to put the middle of
the side of the unit at gun barrel height. The internal triggering sensors are here
at the middle sides of the unit. Triggering is by the muzzle blast.
There is a small V-notch at top center of the unit. You adjust the aim/tilt of the
unit by sighting through this notch at your target.
Next, I connect my external battery to the USB port under the right flap. Turn on the
battery. Turn on the radar. Done. It’s ready to start recording velocities.
The first time you use it, there is a bit of a setup to go through, but it will remember
those settings for your next range session. These settings are set in a preferences menu.
Some of the settings are:
There are more settings, but this is a review, not a user manual. Let me talk about
projectile offset for a minute. There are three options: 6”, 12”, and 18”. This is
the distance to the side of the unit that your barrel is located.
The first time I used it, I think that I had it set for 18” and I was trying to
chronograph a .22 rifle. Nothing was happening. It just would not trigger on a
.22 rifle that far from the unit. It had me scratching my head for a while in frustration.
Finally I figured out that I needed to have the barrel right next to the unit and set the
projectile offset for minimum – 6 inches. Then it started triggering and giving velocity
reliably.
The basic recommendation is to have the muzzle of your firearm even with the side of the
unit. The exception is if you have a muzzle brake that might throw high speed ejecta at
the unit. In that case, the recommendation is to move the muzzle forward to a safe
distance from the unit.
The position of the muzzle, both to the side of the unit, and fore/aft of the unit,
affects the accuracy of the velocity calculations. The beamwidth emitted by the radar
is 7.6° in height by 18.5° in width. What this means is that the radar cannot actually
track your projectile until it enters the radar beam at some downrange distance. The
muzzle velocity the radar displays is therefore a back-calculated velocity, not an
actual measured velocity. Done right, LabRadar claims an accuracy of .1%.
There is an app for your smartphone that will allow you to setup and operate the
LabRadar remotely, instead of manually using the buttons on the unit. It connects
to the LabRadar through Bluetooth. Unfortunately, the app has a rating in the
1-stars on the Android app store because many users report connection problems.
Up to this point, I had never used the app, but in preparation for this review, I
loaded the app both on my Verizon tablet computer, and on my Android smartphone.
It seems to work well on my tablet, but my smartphone gets “communication error”
and I’ve never been able to successfully connect. Users that do get a successful
connection also report that the connection may drop while in use. I will have to
try it on my next range session with the tablet to see if I also have that problem.
If it does work reliably, it appears to be much easier to configure and operate the
LabRadar through the app, than by manually scrolling through all the setup menus
using the rubber buttons on the unit. And if it will reliably operate from my tablet,
that means that I could put the unit out farther from the bench, even with the rifle
muzzle, for improved accuracy of reported velocity.
Now let’s talk about the downrange velocity measurements. The LabRadar allows you
to configure five downrange distances that it will report velocities for. Since my
primary use is for rifle testing, I set mine up to report downrange velocities for
20, 40, 60, 80, and 100 yards. However, since this is a lower-powered consumer
grade radar, not a professional grade radar, it cannot reliably report velocities
all the way out to 100 yards. The LabRadar FAQ web page explains:
.177 Pellet – 30 yards;
* Since every bullet has a different profile your results may vary. In general,
the larger the base (excluding the boat tail) the greater the distance the
projectile can be acquired.
OK, are you ready now to take a deeper dive? This will allow us to pull together
a lot of what’s been discussed up to this point. Remember what the Hornady guys said:
Just because we can set the display up to provide five additional downrange velocities,
doesn’t mean that the LabRadar doesn’t record even more data than that.
I mentioned that the LabRadar has an SD card slot. It will record much more information
in .csv files on that SD card than it will display on the screen, or even on the app.
Every shot that the LabRadar measures is recorded as part of a series. A series is
exactly what it sounds like — a series of shots. You tell it when you want to start
a new series, which will end the current series. I have been doing some testing
recently to help me decide from among four rifles, which are the best candidates for
my upcoming sheep hunt. I assembled a number of different loads for each rifle, and
for each load, I shot 3 groups of 3 shots for each load — 9 shots. You decide what
your series represents. For me it was 9 shots of a particular load.
The information saved to SD card for each series includes:
For each shot in the series:
Each series is contained in its own subfolder on the SD card, under a main folder
called “LBR”. Each series subfolder has one more subfolder under it called “TRK”,
for track. Inside the track subfolder, for each shot in the series is a separate
.csv file which includes that fine velocity detail that the Hornady guys were
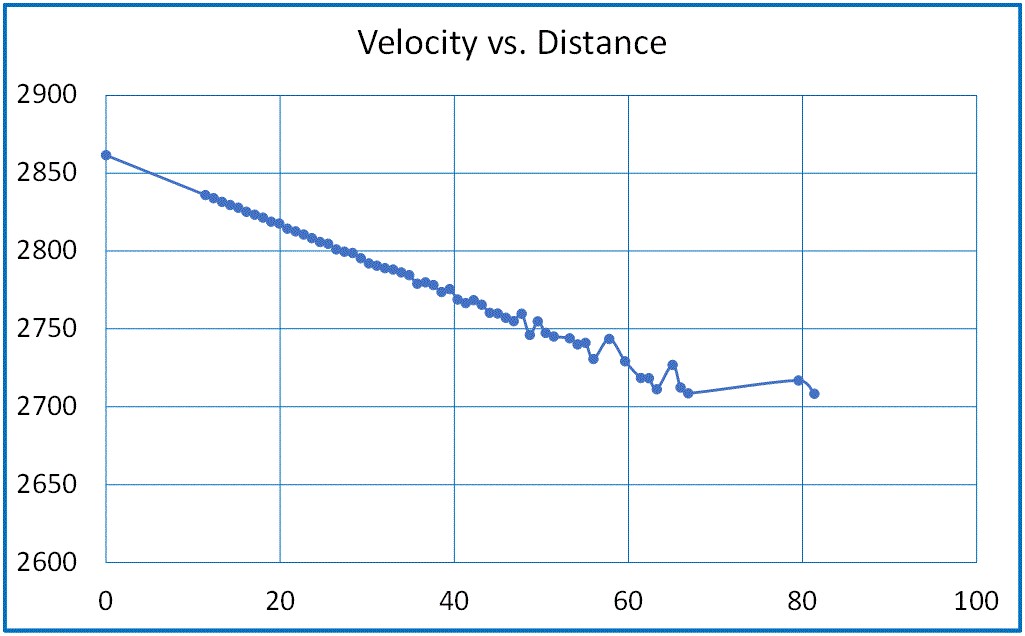
talking about. Take a look at this chart generated from the track data of shot
9 of series 29 of my data:
This data illuminates several of the points that we’ve discussed so far. First
notice the gap between distance zero and the rest of the dots in the dataset.
This shows that the the bullet did not enter the radar beam until 11 yards out.
V0 (muzzle velocity) is a back-calculated number.
Next, we can see that the actual distance intervals that the radar records is
about 1 yard. For example, The actual distances for the first 10 data points are
11.4, 12.4, 13.3, 14.2, 15.2, 16.1, 17.1, 18.0, 19.0, and 19.9 yards.
Then finally we can see that it becomes more and more difficult for the radar to
track the projectile as distance increases. The data also contains a signal to
noise ratio (SNR) figure for each data point. The close in data points have SNRs
in the 30s. By the time we get out to 80 yards, the SNR has deteriorated to
single digits. At longer distance, the indicated velocities start bouncing around
indicating less reliable data. The last two points have left the trend line and
are not believable. This was a .308” 150 grain Hornady softpoint, a flat base
bullet which should give a relatively good radar reflection. The professional
grade Doppler radar that Hornady uses provides reliable data out past 500 yards,
but the LabRadar data starts to get shaky around 50 yards in this case.
But that’s OK, because we didn’t spend anywhere near the money that Hornady did
for their Doppler radar. Plus, as I said earlier, Hornady needs reliable long
range velocity data for R&D and to provide accurate B.C. numbers to their customers.
You and I don’t need to, but there actually is enough downrange data to be able to
calculate B.C. or drag coefficient if we wanted to. There is probably a regulatory
reason that this consumer grade device is limited to a lower transmit power.
So, where does that leave us? Certainly the LabRadar has its weaknesses and
limitations. The user interface when using the rubber buttons is a little weird,
but one can learn to live with that. The app may or may not work with your device.
Supposedly, they are working on a whole new app. Time will tell. If you want to
measure long range downrange velocity, be prepared to open your wallet wide for a
professional grade radar, and likely government licensing, if that’s what you
think you need.
For me, it’s a large improvement over my old PACT chronograph. It is easier to
transport, much easier and less time consuming to set up, and it is in no danger
of taking a bullet. There is no distracting sky screen arrangement in your line
of sight that you have to worry about. The display is also easier to read than
the PACT. Did we get our money’s worth from this product? I certainly think so.
| ||||||
| If you enjoyed this story, or found it useful, please consider clicking here to join the NRA at a discount of $15 off the normal membership cost. You will be supporting both this website and adding your voice in support of the Second Amendment. Thank you very much. |

|
|
|