| Articles | Documents | Equipment | Events | Links | Membership | Miscellaneous | Scrapbook | Targets | What's New |
|
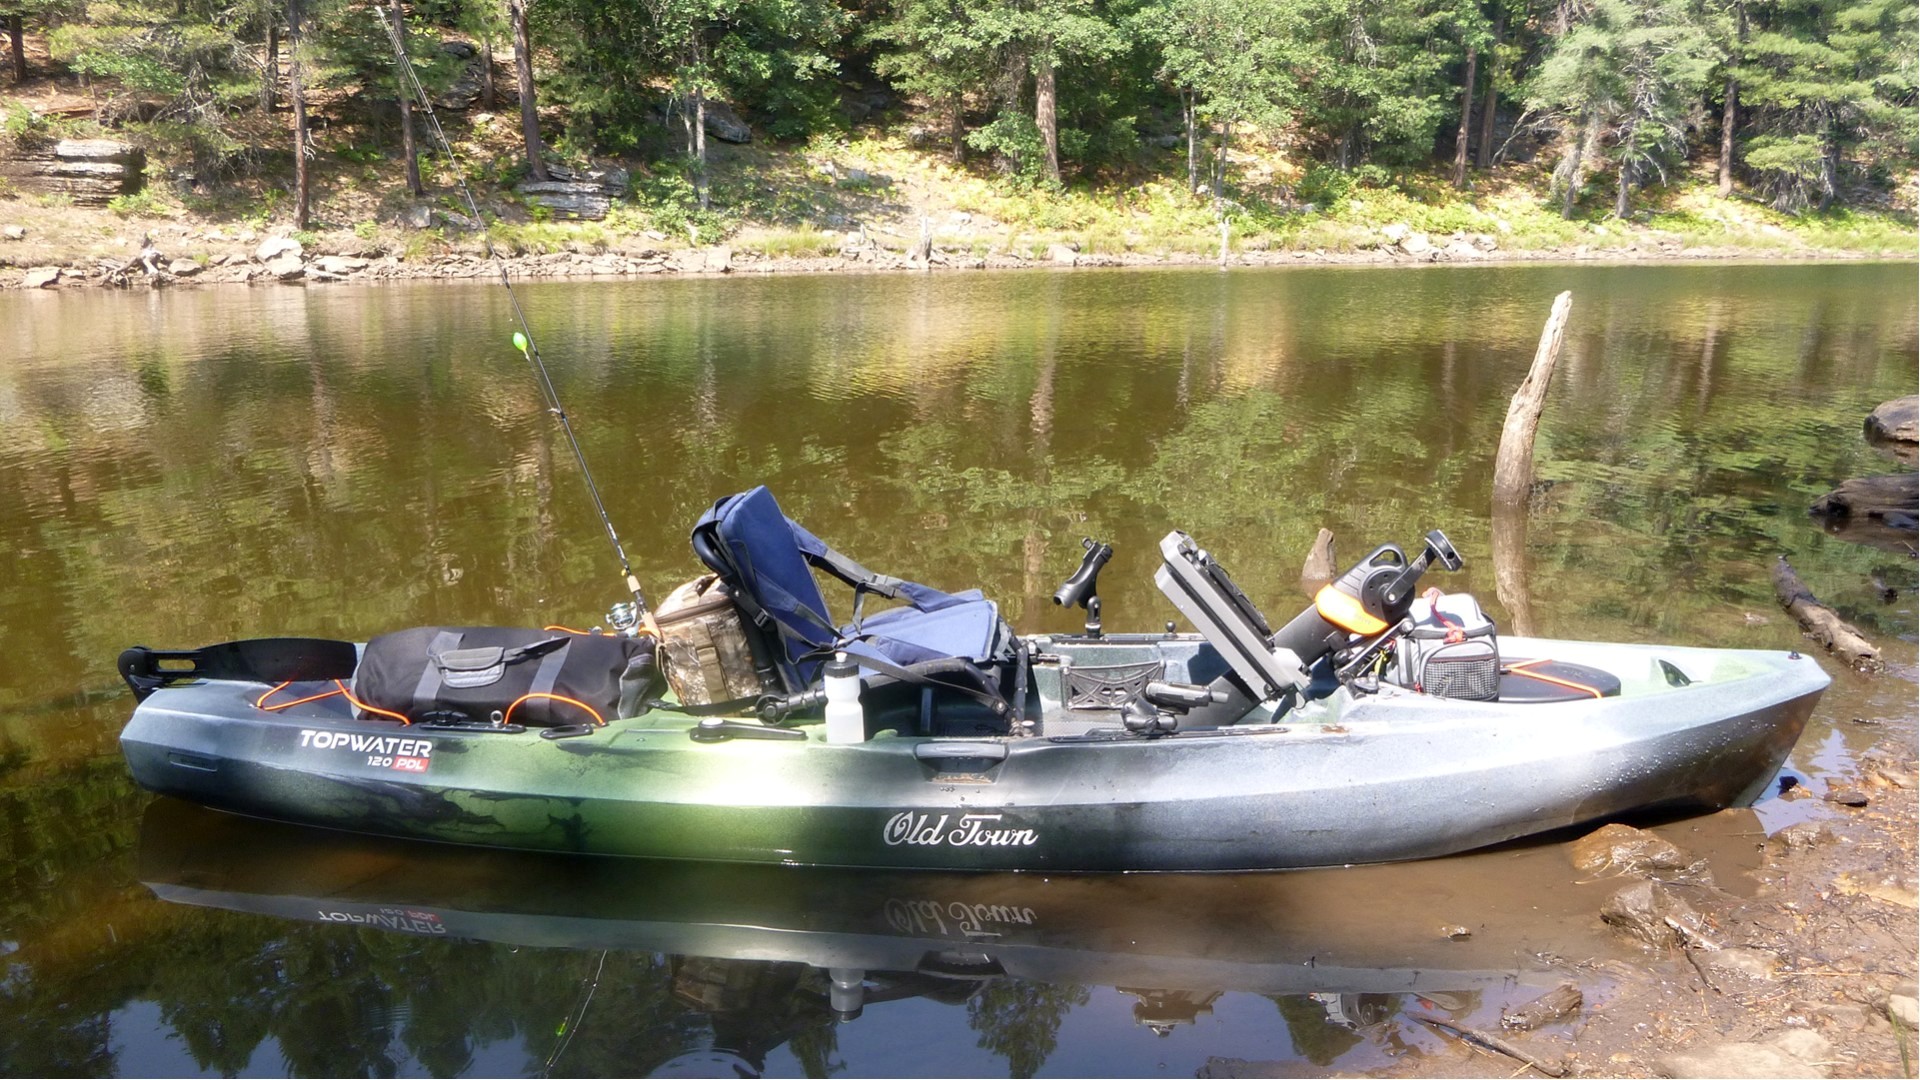
Old Town Topwater 120 Pedal Kayak Part 1 - Overview and Features | April 2021 | |||||||||||
| Dan Martinez | ||||||||||||
Well, that didn’t take very long. In the May 2020 issue of the newsletter,
I wrote about all the fun I was having with my first kayak, an
Ascend FS10
sit-inside kayak from Bass Pro. I brought the FS10 home in April of 2020.
By August, I had already decided that it was time for an upgrade. My new
kayak is an Old Town Topwater 120 PDL.
And a BIG upgrade it is. The FS10 is a 10-foot-long sit-inside kayak. The
Topwater 120 PDL is a 12-foot-long sit-on-top kayak powered by a pedal-drive
system.
Sit-on-Top vs. Sit-Inside
The Topwater 120 PDL is a different beast entirely. First of all, it is a sit-on-top
kayak, which means that it is almost unsinkable. The sealed hull carries a lot of air
inside of it. The Topwater 120 PDL has a weight carrying capacity of 500 pounds, so
I have a lot more margin with this boat than I do with the FS10.
If it should flip upside down, all you have to do is flip it back right-side up, wiggle
yourself back onboard and carry on. The open cockpit of the FS10 would allow the hull
to fill with water, which is a major problem.
Being on big water lakes with the Topwater is totally confidence inspiring. I recently
had the Topwater out on Saguaro Lake. A couple of large powerboats passed me in quick
succession, their wakes joined together, amplifying each other, causing large rolling
waves to head toward me. I turned the Topwater to take them head-on. Even though the
Topwater sits higher off the water than the little FS10, I still had the bow “submarine”
under the surface as I rode down one wave as the second crest came at me. Aside from
the thrilling splash as the bow went under for a moment, the Topwater took that in
stride. That likely would have swamped the FS10 and would have created a water bailing
situation for me.
And that is the big difference between a sit-inside and a sit-on-top kayak. Though I
had a significant amount of water come over the bow and into the deck of the Topwater,
the floor of the Topwater actually sits higher than the surface of the water. There
are eleven “scupper” holes in the deck of the Topwater 120 that allow any water that
may come in to simply and immediately drain out. Actually, the way the scupper holes
are shaped on the bottom of the hull, when moving forward, water is actually sucked
from the deck down through the holes and out of the boat.
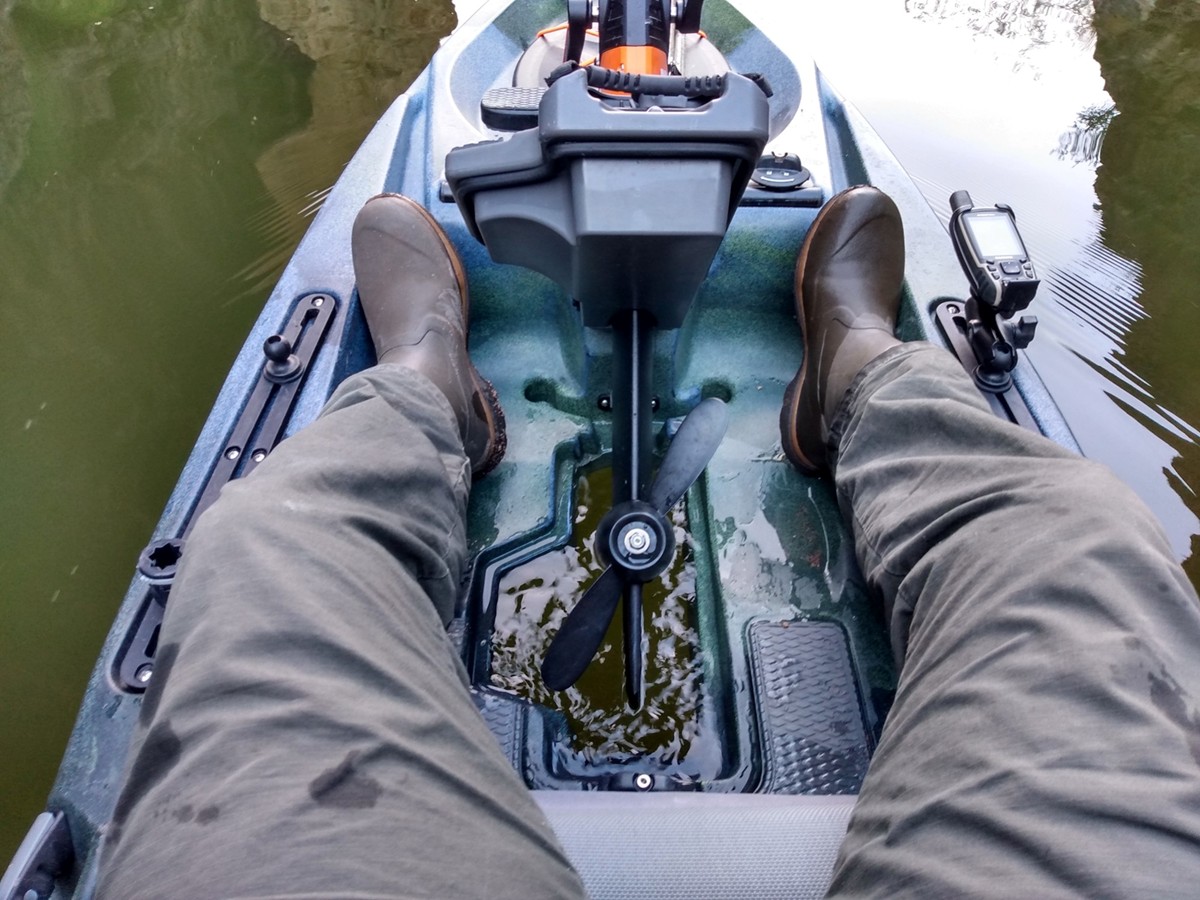
Wait a minute, there are holes in the hull? And it doesn’t sink? Yeah! Not only
that, but there is a huge hole in the middle of the floor where the pedal drive sits.
But because a sit-on-top kayak is sort of like a boat-shaped hollow surfboard, those
holes are a feature, not a bug.
Understand that the scupper holes are actually tubes that connect the top deck of the
boat with the bottom of the hull. Besides allowing water on the deck to drain out,
they also serve another important purpose. Because they connect the top surface of
the plastic to the bottom surface with multiple vertical towers of plastic, they add
rigidity to the deck.
Because it is designed primarily as a fishing kayak, it is meant for casting from a
standing position. Without these reinforcing scuppers, you would feel the deck flexing
a lot under your feet when standing. Instead, the deck feels quite solid.
The Topwater 120 is a very stable kayak. I suggested that it would be relatively easy
to flip it back right-side up if you would ever flip it over. What would not be easy,
would be to flip it upside down in the first place. It is 36” wide and features a double
pontoon hull design. Old Town’s marketing-speak for this is a “DoubleU” hull. The
outside edges of the bottom of the hull consist of these large volume pontoons. The
center of the hull is largely concave except for a sharp center keel toward the rear of
the hull which helps to keep the boat tracking in a straight line.
This double-pontoon design makes the boat very stable for standing. That’s not to say
that a standing fisherman could not lose his balance and fall over the side – that’s very
possible. But chances are good that when he surfaces, he would find his boat still
floating upright, no matter how much flailing he did as he went overboard.
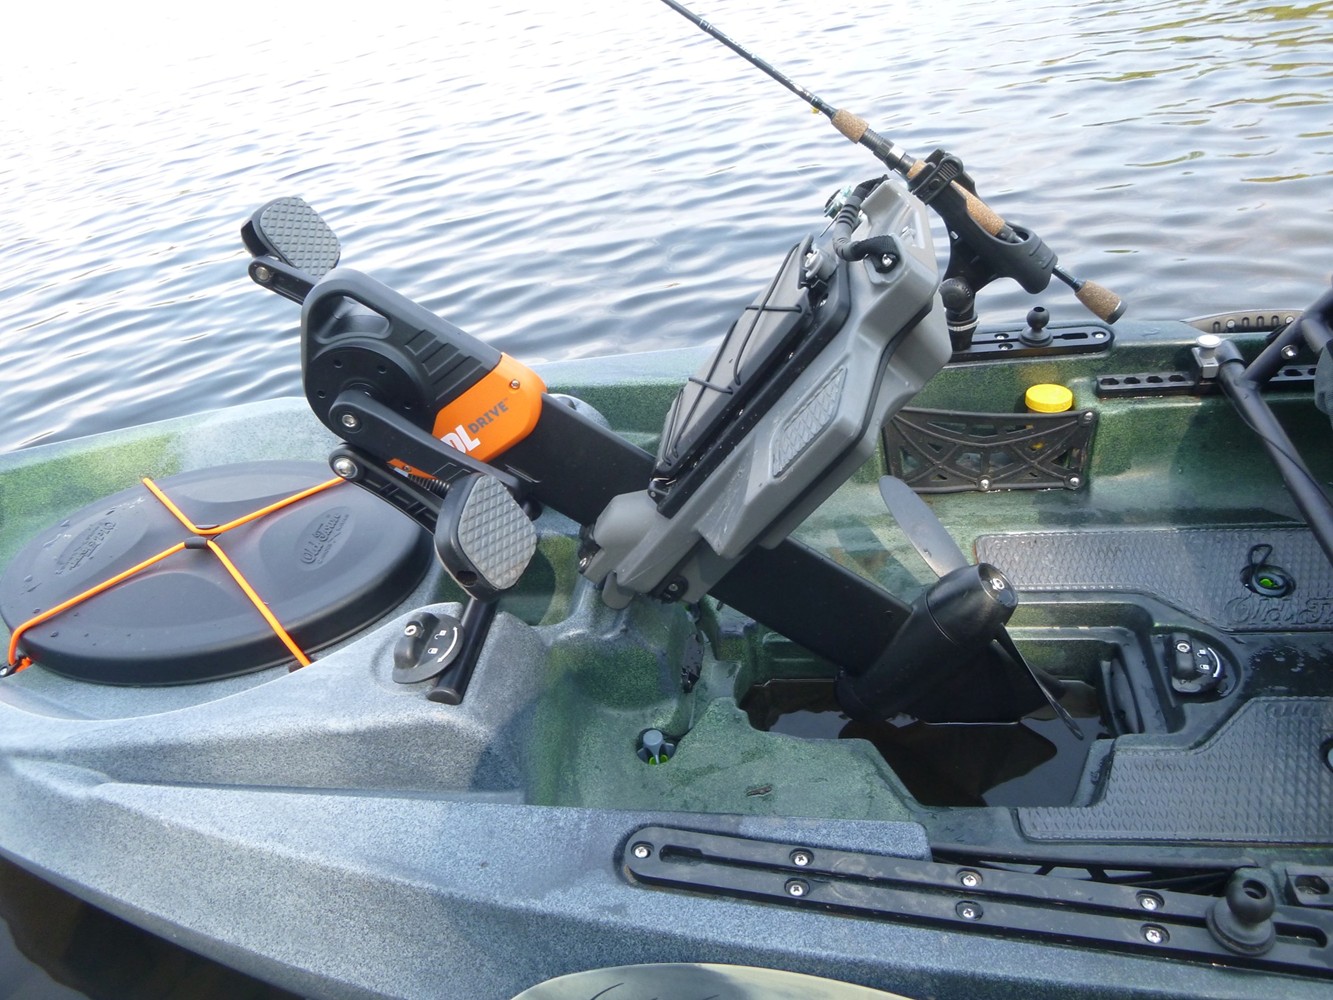
Pedal vs. Paddle
The pedal drive system allows you to use your legs to propel and position the boat, leaving
your hands mostly free to work with the rod. The pedal drive allows you to go forward, and
just as easily backwards by reversing the direction of pedaling.
You still need a paddle with this boat though. Anytime that you get into water too shallow
for the pedal drive, you need to pop it up and tilt it forward to get the prop out of the
water. It hangs almost a foot below the lowest part of the hull. When launching or landing
at a beach, you begin and end with the pedal drive up and a paddle in your hands. But as
soon as the water gets deep enough, you stow the paddle in the paddle clip on the side of the
boat, drop the pedal drive and the rudder into the water, and get pedaling! It’s pretty
exciting how nicely the boat moves out once the propeller starts spinning.
Old town has an extensive line of sit-on-top fishing kayaks. There’s the Topwater series, and
now the Sportsman line. In the Topwater series, the boats are available in 10½ foot and 12
foot sizes, both with and without the pedal drive (paddle only). In the Sportsman series, the
same boats are available as in the Topwater series, plus several more including three new
kayaks with integrated electric motors by MinnKota, a sister company to Old Town.
Actually, except for the electric boats, the introduction of the Sportsman series was primarily
a rebranding and minor enhancement of several different boats that they were making previously,
but now brought under one umbrella name. The Topwater boats have almost identical counterparts
in the Sportsman series. When I decided that I wanted to upgrade to one of these Old Towns, I
had a lot of choices and boiling it down to one of them was not easy.
Ultimately, I decided that 1) the 12 foot size was the right size for me. 2) Pedal drive was
the right propulsion choice for me. 3) My favorite color was “First Light”, available only as
a Topwater, not as a Sportsman.
Before finalizing those decisions, I almost pulled the trigger on the 10½ foot Sportsman
powered by a MinnKota electric motor. That’s a very cool boat, but in the end, I decided
against the electric motor for a couple of reasons.
In the May story, I mentioned that I’ve owned a canoe for many years and that has been
my primary outdoorsman’s boat. I don’t think that I mentioned that my primary propulsion for
that canoe was an electric trolling motor. I have plenty of experience with an electrified
small boat.
Besides having to maintain and lug around a battery, there are two other disadvantages to an
electric boat:
2) “Range Anxiety” – You are always worried about getting a few miles away from your launching
point, then not having enough juice to get back. As a result, I never ran the canoe at the
highest speed, speed 5. I would usually run it at speed 3 to conserve battery power. That
would move me just under 3 mph. Getting across a lake took some time. Plus, I would never
venture farther than maybe 2 miles before deciding that I had gone far enough.
Ah, the pedal drive … As long as you are still alive, your propeller can spin. At an easy,
sustainable pedaling speed, I can move between 3 to 4 mph. 3.2 mph is a number that I see a
lot on my GPS. With the wind behind me, I’ll do closer to the 4 mph mark. With a max-effort
sprint, I can push the boat just past 5 mph. Gearing is approximately 10:1. With one full
rotation of the pedals, the propeller spins 10 times.
So far, my longest one-way trips have been 3.4 and 3.9 miles. My longest day has been about
7 miles. I would never have attempted that with electric power. OK, yes, my knee and hip
joints can get a little creaky and my leg muscles a little tired on those long days, but not
to the point of putting me out of commission. Pedaling across the water in this boat is
calming, joyful, good exercise.
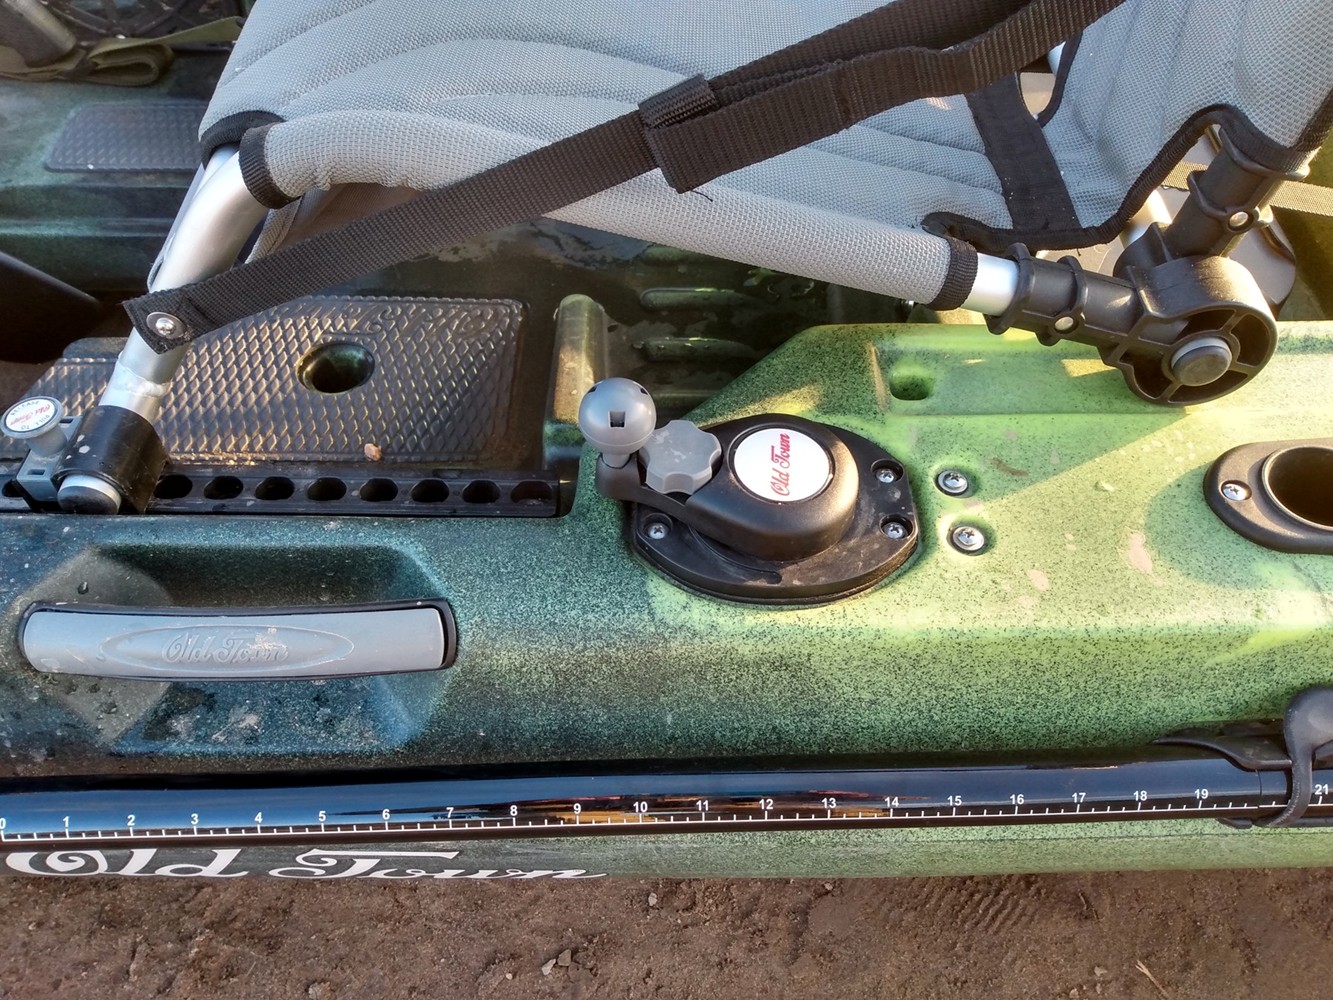
The pedal drive is easily removed for traveling. It is held in place in the hull with three
180° rotating locking knobs, two up front and one in the rear. Unlocking the rear knob
between your legs is what allows the drive to tilt up and roll forward for shallow water.
The drive weighs 19 pounds. It is a very robust piece of equipment. Other kayak makers also
make pedal drive kayaks, but only Old Town warranties their drive for a full 5 years. From
stem to stern, the whole boat feels like a high-quality piece of gear.
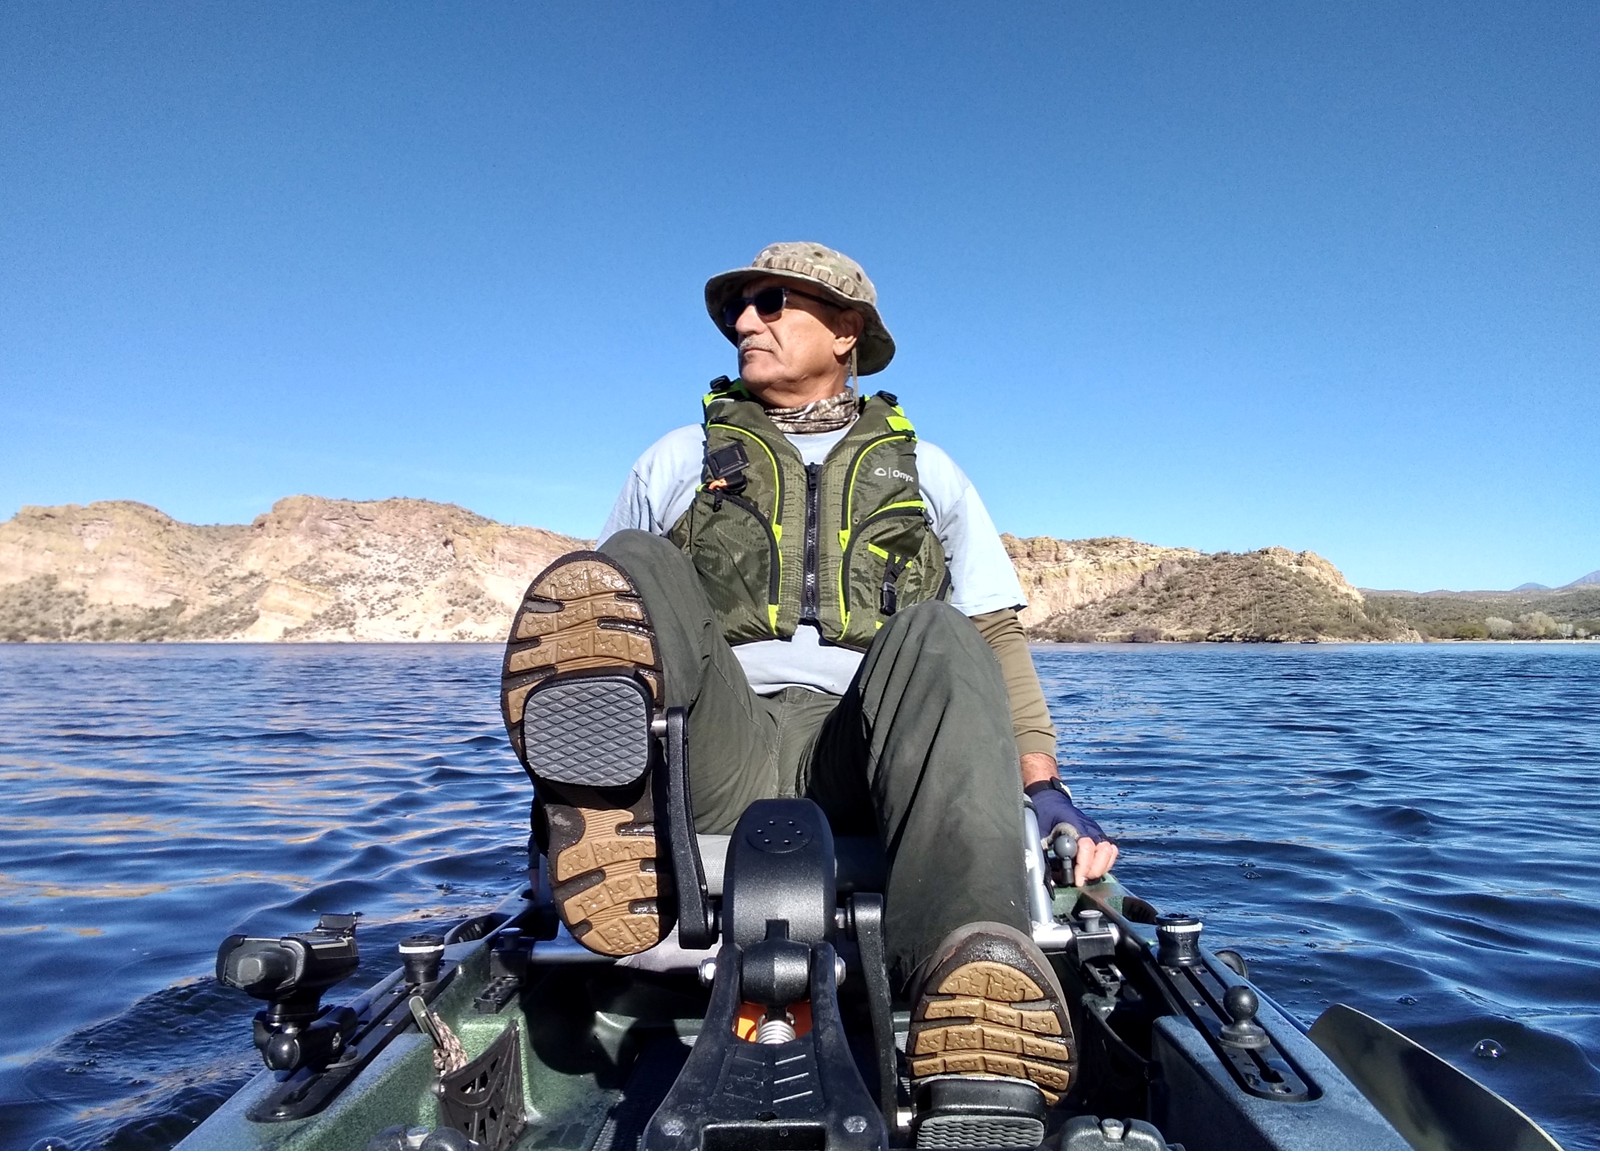
Seat Comfort
The seat was one of the main differences between the Topwater and the Sportsman
versions of this boat. Many reviewers complained about the Topwater’s seat.
They said that they felt pressure on their tailbone from the lower bar. On the
contrary, there were many raves about the Sportsman’s seat. I knew about this
when I chose the Topwater, but I had a plan. Actually, I had two options.
The first option was to add a Cabela’s/Bass Pro
“Eclipse
Stash” stadium seat for $20. Used upside down, with the padded side
against my back, this seat adds about an inch of additional padding for my back.
The second option was to order the improved seat directly from Old Town. This is
a more expensive option, as that seat costs $150. The stadium seat did the job,
but I ended up having to buy the upgraded seat anyway.
My sons and I took the two kayaks out to the Verde River at Sheep’s Bridge. The
Ascend FS10 and the seats for both kayaks were in the bed of the truck. The
Topwater was strapped on the rack over the bed.
So now I am using both the upgrade seat plus the stadium seat. I found that the
top bar of the upgraded seat was bothering my back. The padding of the
stadium seat solves the problem.
Another seating comfort issue concerns your choice of life vest. I found that a
standard PFD (life vest) with back flotation was pretty uncomfortable against the
seat back. When you are sitting, the back flotation foam of the PFD ends midway
down your back, which leaves the lower half of your back unsupported.
Old Town has a solution for that – a PFD with a mesh back and an abbreviated high
foam block that sits above the top of the seat back, the
Lure
Angler. It allows full contact of your back against the seat. Dang. There goes
another $140 order to Old Town.
Loaded with Features
Too often, when I am coming in to shore to land, I will swing the pedal drive up out of
the water but forget to bring the rudder up. This is not too big of a problem, since
your forward motion will push the rudder up anyways as the rudder grounds out as you
reach the shallows.
The seat is mounted on tracks. By pulling up on two locking knobs, you can slide the
seat forwards or backwards to optimize your leg reach to the pedals. At full extension,
you want to still have a little bend in your knees for the most comfortable pedaling.
There is a small latching dry box integrated into the pedal drive unit. This is the
perfect place to throw your wallet, your keys, and your phone. The lid is rubber
gasketed, and the contents have remained perfectly dry for me.
The boat is equipped with three flush-mount rod holders. There are two rearward angled
rod holders behind the seat, plus one forward angled rod holder beside your seat on the
left-hand side. This is a nice position for your rod when trying to rig terminal tackle.
There are two accessory mounting tracks located on the gunwales in front of the seat on
either side of the pedal drive. Accessory tracks are a common feature on fishing kayaks
that allow you to mount things such as fish finders, GPS units, or additional rod holders.
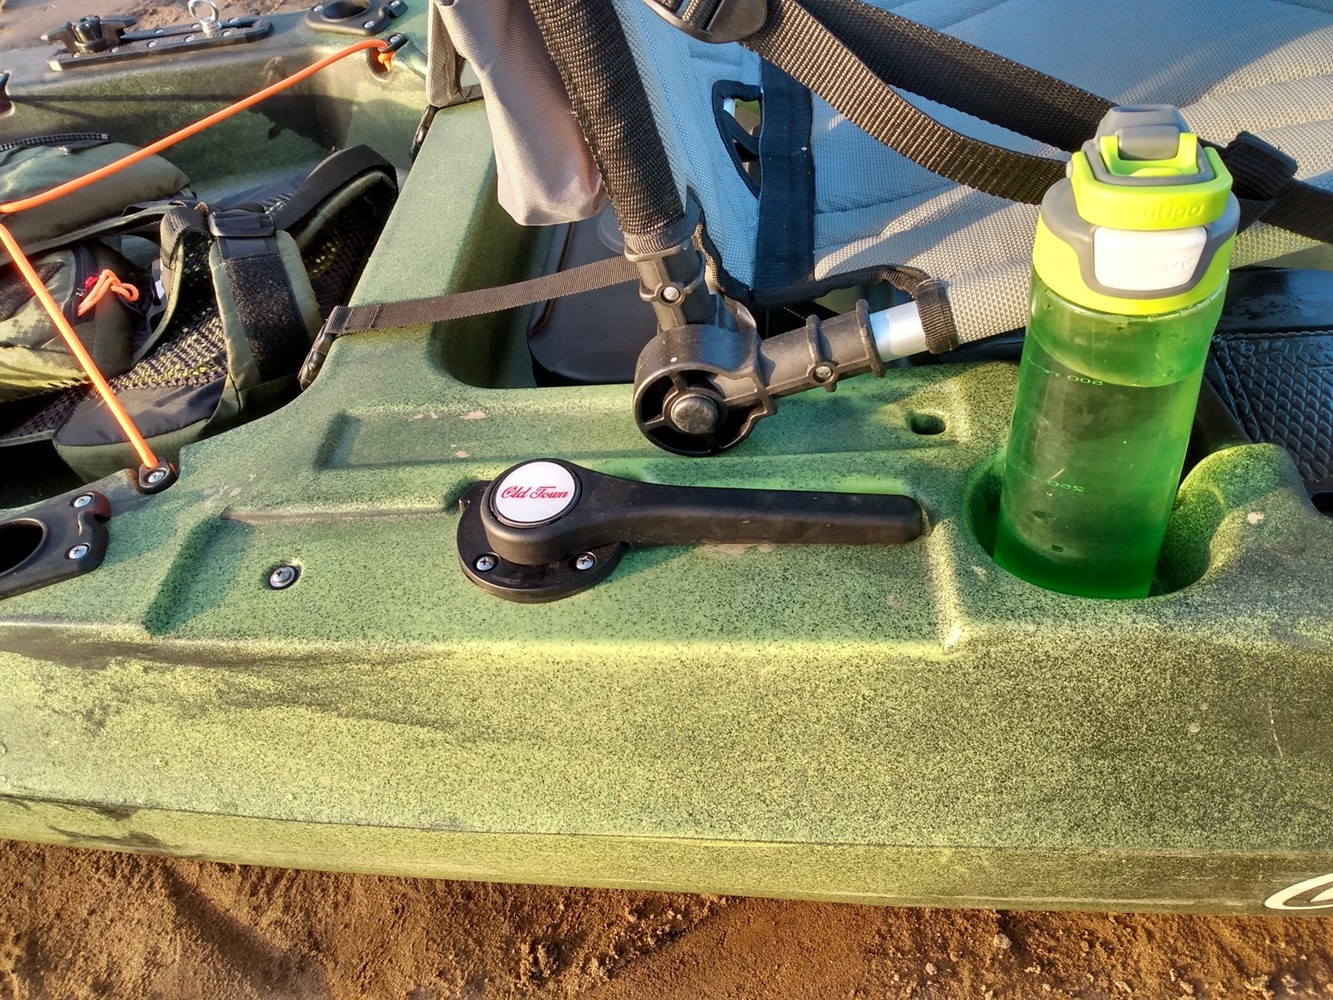
I added a couple more aftermarket accessory tracks in the back. On these I mounted a
couple of stainless steel rings and plastic cleats for attaching anchor or shore lines.
Two catch pockets enclosed by a rubber net-thingy are molded in to the sides of the deck
in front of the seat. These are handy places to stash bait containers, fish pliers,
anything OK to get splashed, while on the water.
Behind the seat is a large cargo well, measuring about 32 inches long by 23 inches at its
widest point. Up front in the bow is a hatch that provides access to dry storage inside
of the hull. The hatch is oval shaped, measuring about 18 inches long by 12½ inches wide.
I believe that of all the sit-on-top fishing kayaks in Old Town’s lineup, the PDL 120s
have the largest bow hatch.
The hatch cover is held in place by bungees. The rear cargo well also has a bungee
criss-crossing the opening for cargo retention. This bungee serves the additional
purpose of retaining the rudder in the stowed position when traveling.
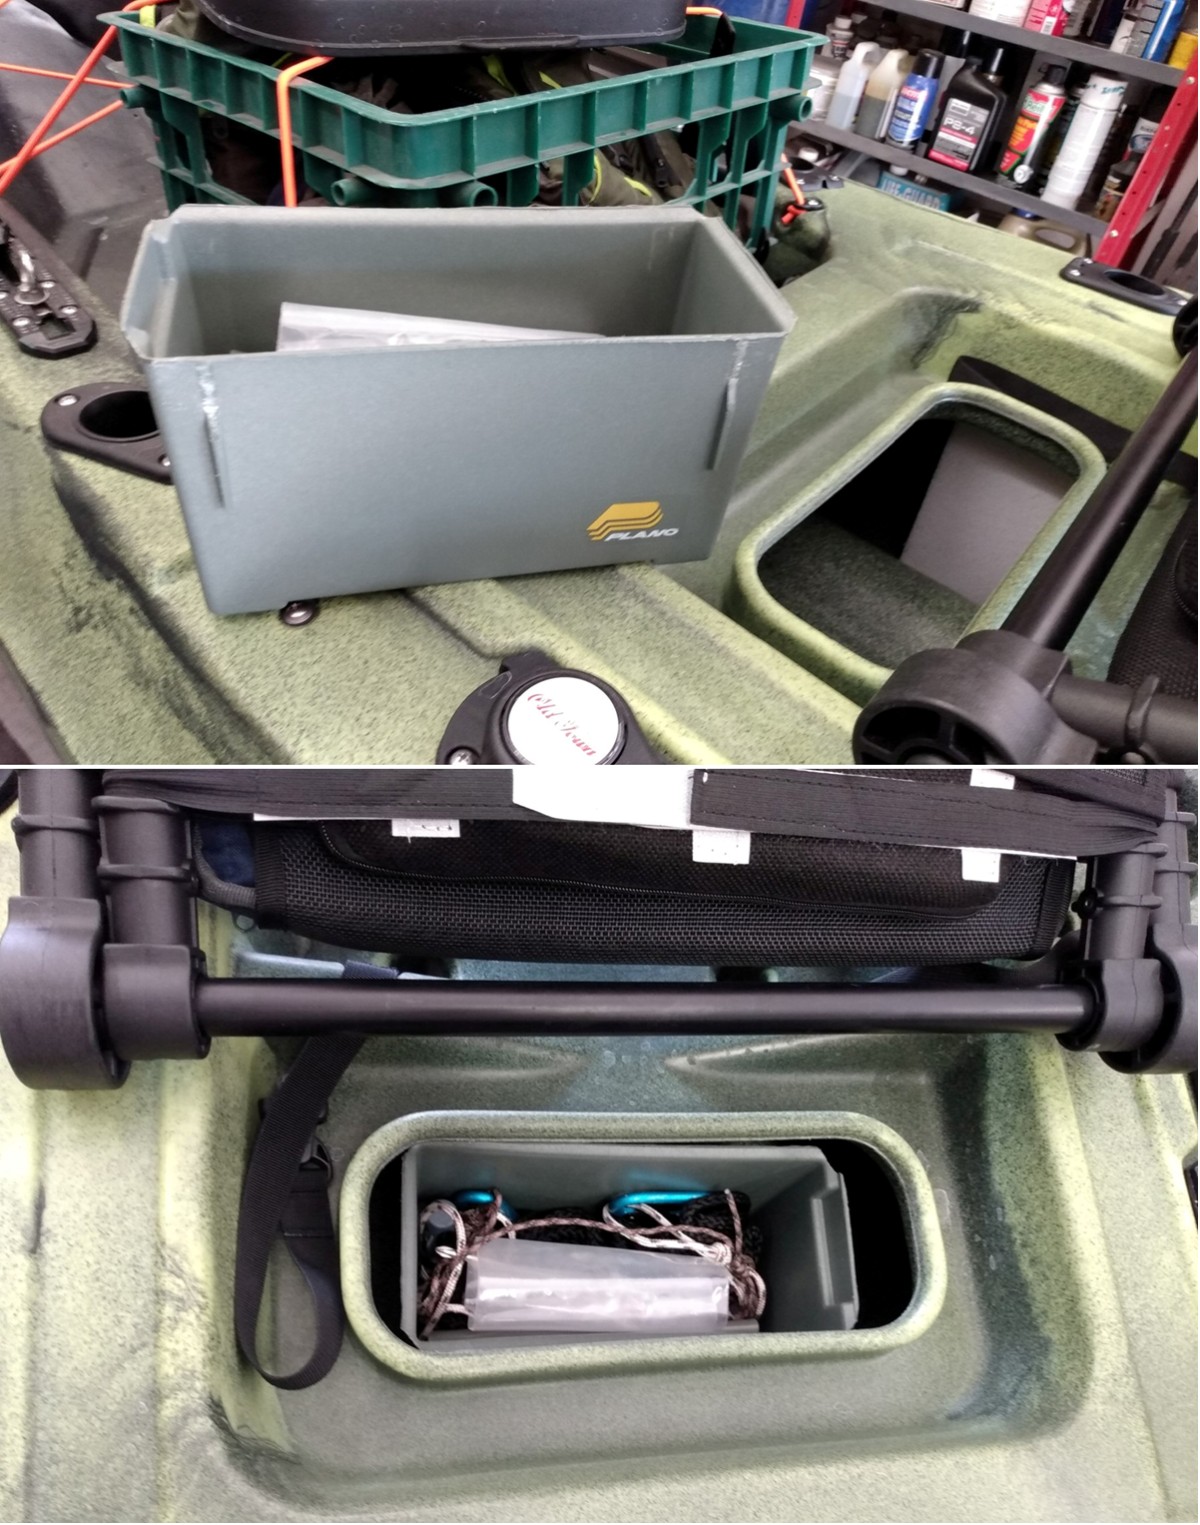
There is another small hatch below the rear of the seat. This is primarily for midship
access to the inside of the hull. You may need to get in there to perform maintenance
on the rudder control cables for instance. But I cut down a small Plano plastic ammo
box to make this hatch useful for storage. You need something to corral stuff that you
might throw into that hole, or who knows where inside the hull it may end up.
I store a line in there for tying up to shore, plus some mini-carabiners to make
attachment to the boat easier. I also store a Phillips screwdriver, an Allen wrench,
and a fixed socket wrench in there. The fixed-socket is the size needed to remove the
prop. I also store a spare prop, extra prop shear pins, and an extra pedal drive
locking knob.
The rear locking knob is designed to break if you should hit an underwater rock or
something with your pedal drive. Hitting an underwater obstacle will force the pedal
drive to rotate upwards, breaking the locking knob which is purposely designed as the
weak link. It’s only a $3 part.
I want to have those spare parts and tools always on-hand to be able to make repairs on
the water if something should go wrong.
There are three bolted-on carrying handles at the bow and on the sides. Two more lifting
handles are molded into the stern on either side of the rudder. This was an enhancement
first seen on the Sportsman hulls, later added to the Topwater hulls. Originally, there
was one bolted handle on top of the hull at the rear on only one side of the rudder. I
think that you can see how that wouldn’t work too well, as the handle was off-center.
Finally, there is a slot in the rudder close to the rudder’s pivot point that can sort-of
work as a handle. Obviously, pulling up on the boat from this rudder handle will cause the
rudder to pivot upwards, so the utility of this handle is somewhat limited.
Transportation
Well, the Topwater weighs even more than the canoe. With pedal drive and chair, the
Topwater is spec’d to weigh 116 pounds. Wasn’t that going in the wrong direction? Well yes,
but there are ways to deal with it. First of all, by removing the pedal drive and the chair,
the bare hull weight that you need to lift drops to about 92 pounds.
I always loaded the canoe on the rack on top of truck using two people and a ladder,
lifting it upside down from the side of the truck. Awkward!
The best way to transport the Topwater is hull-down, which means that I can push it up
from the back all by myself, which is far easier. I had to invest in a new rack for the
truck plus some pads. The 12 foot length of the boat turns out to be an advantage
compared to a 10 footer.
To load it, I start with the boat at an angle at a rear corner of the truck. I begin by
lifting the bow first onto the rear rack. The pedal drive hole in the hull is useful here,
because from underneath the hull, it gives me a place to grab the boat as I position the
bow onto the rear rack.
Then I move around to the stern of the boat and lift from those molded-in lifting handles.
I push the boat up as far as I can, then let the bow drop onto the front rack. This is
why the 12 foot length is an advantage. Because of how high that rear rack is, I don’t
think that I could push a 10 foot kayak far enough that the bow would drop onto the front
rack.
With the boat now sitting on the racks, I can climb into the bed of the truck to push the
boat a little further forward to center it on the racks. Then I tie it down with cam
buckle straps. But how did I get the boat next to the truck in the first place? With
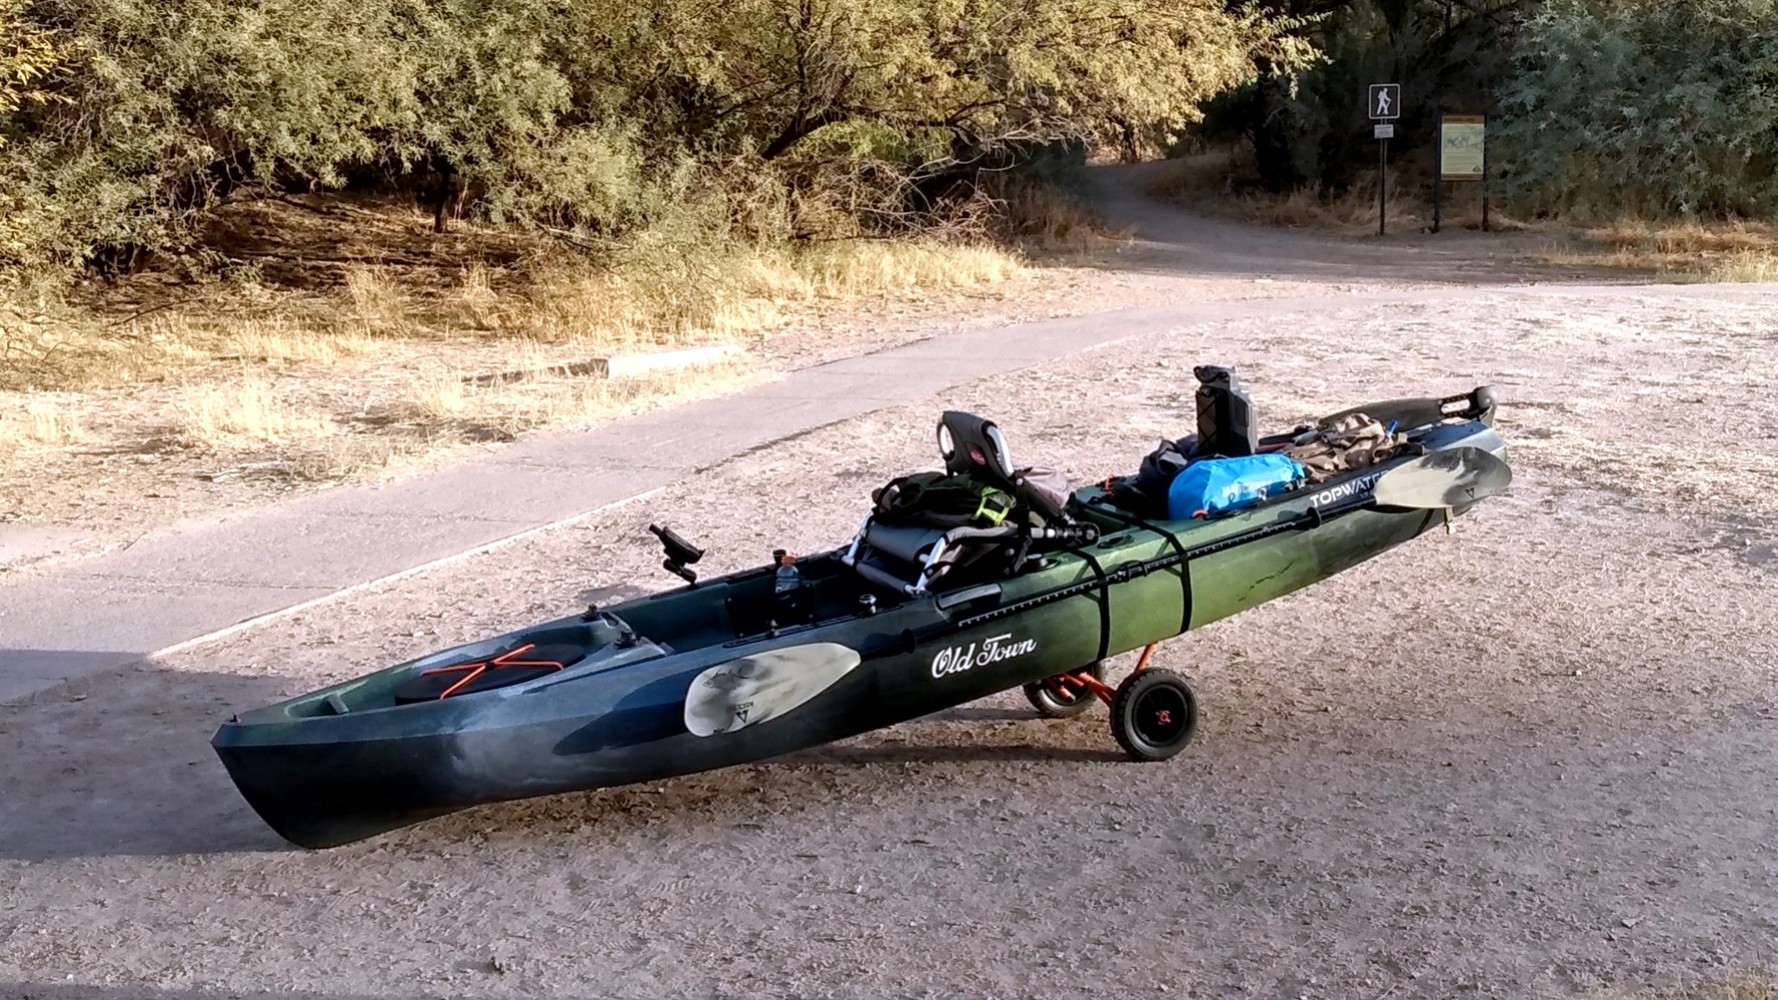
a kayak cart.
The kayak cart makes it pretty easy to move the boat around on land. I use it to move
the boat from my garage out to the truck out in the driveway, which isn’t far, but it
sure beats carrying it.
The cart came in quite useful at Butcher Jones beach at Saguaro Lake. You can’t pull
up right next to the water there. The closest you can get your vehicle to the water
is around 100 yards. After getting the boat down from the rack, I put it on the cart,
loaded it up, then wheeled it down to the water. I learned that it is best to locate
the cart near the seat, and to load everything into the rear cargo well, including the
pedal drive. That lessens the weight that you have to lift and carry from the bow
handle. Hauling it across the sandy berm near the water was toughest part.
End of Part 1
© Honeywell Sportsman Club. All rights reserved. | ||||||||||||


|
The Honeywell Sportsman Club is a small group of shooting and outdoor enthusiasts in the Phoenix, Arizona area. Our website is ad-free and completely free to use for everyone. But we do have expenses that we need to cover, such as the web hosting fee and our liability insurance. If you enjoyed visiting our website, found it useful in some way, or if you enjoyed reading this story, please consider tipping us through our PayPal donation jar below. Thanks for visiting, and come back soon. |
|
|