I’ve been using a system for long range ballistic compensation
based around the Weaver V16 scope for a number of years. The Weaver V16 has
nicely marked, medium-height, hand-adjustable turrets. The turrets do have
caps, unlike a lot of the tactical or varmint type scopes, which have very
large and very high turrets with no caps. Large exposed turrets are a
liability in the game fields.
Once you have established your zero, the Weaver’s turrets can also be reset
to a zero reference mark. One full rotation of the turrets is 12 inches at
100 yards, with a click every quarter inch. The adjustments are nice and
reliable. You want three inches up? Click up 12 clicks to the “3” index
mark. Couldn’t be simpler.
So after chronographing a favorite load, I would run the numbers on ballistic
software to make a click-chart with the “come-ups” or click settings for
every ten yards from 200 to 500 yards. This chart gets taped to the stock so
that in the field, you: 1) see target; 2) range target with laser rangefinder;
3) consult click chart for ranged distance; 4) click the scope up to the
correct setting; 5) fire!
This is a great system. As long as you’ve put all the right numbers into the
software, and as long as your rifle is capable of holding decent groups out to
the farther ranges, you’ll be able to hit anything that you can range. I’ve
recently discovered one large drawback, though. To use this system, you’ve
got to be able to read the chart!
You older guys know what I’m talking about: presbyopia. It’s when the eyes can
no longer focus on anything closer than arms length. In the last couple of
years, my short-range vision has gone kaput! Between steps 2) and 3) above, I
now would have to insert a step 2a): fish around for reading glasses and put
them on. Then after step four, I would have to take more time to take the
glasses off before looking through the scope. By the time I would finally be
ready to squeeze the trigger, that deer would have long ago gotten bored and
moved off.
Fortunately, there is an alternative system for long range ballistic compensation
that is even faster to use, and still works with aging eyes: the ballistic reticle.
Scopes with various types of ballistic reticles have really come on strong in
the last couple of years. Burris has come out with their Ballistic Plex and
Ballistic Mil-Dot scopes. Leupold also has two versions that they call the
“Boone and Crockett” reticle for big game hunting, and the “Varmint Hunter’s”
reticle for use on fast-stepping varmint rifles. Bushnell and Pentax are
other companies now offering ballistic reticles in their scope lines. I’m
sure there are others.
One of the earliest companies offering a ballistic reticle was Swarovski.
They brought out the TDS Tri-Factor reticle, then later started offering it
in Kahles scopes. Kahles (pronounced CAW-less) is a subsidiary of Swarovski.
Both Swarovski and Kahles are based in Austria – Swarovski in Absam and
Kahles in Vienna.
A ballistic reticle is characterized by a central crosshair with additional
aiming points or bars on the vertical crosshair below the central intersection.
Because the trajectory of a bullet is a curve, these additional aiming points
are not usually spaced equally as they proceed down the vertical bar. They
could be though. Mil-dots and the Bushnell TRX reticle are examples that are
equally spaced.
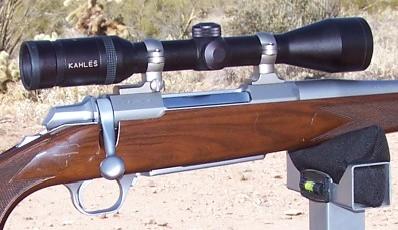
A couple years back, I stumbled on a beautiful Sako Hunter in 7mm Rem Mag at
a price I could not resist. I figured it deserved a higher-end European scope,
so I dished-out the most money I’ve ever spent on a scope and bought a Kahles
American Hunter 3-9x42 with the TDS ballistic reticle. The option of the TDS
reticle added something like $60 to the price over the same scope with a
standard reticle. This premium goes straight to Mr. T.D. Smith, the inventor
of the TDS reticle system.
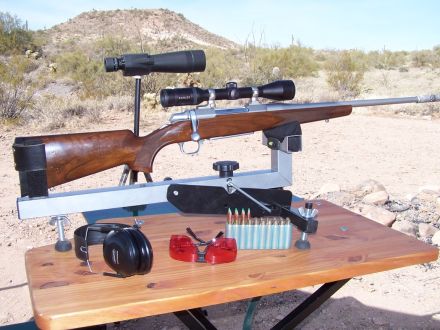
I’ve recently made the decision to divest the Sako from my collection, but
I’m keeping the scope. My favorite big game rifle for many years has been
the Browning A-Bolt .30-06 I purchased in July of 1995. It has been wearing
a click chart on its stock and a Weaver V16 for a long time, but now my
eyesight has dictated a change. The Kahles is now married to the A-Bolt.
The scope manufacturers offer various shortcut methods for the non-technical
buyer to understand and make use of his new ballistic reticle scope. Swarovski
and Kahles for example, ask the shooter to determine his rifle’s
“TDS Factor". This is done by first sighting in the rifle, using the center
crosshair, for a perfect zero at 200 yards. Next the shooter should take his
target out to 300 yards to find out how much drop he is getting at this farther
distance with his 200 yard zero. This drop, from 200 to 300 yards, expressed in
inches, is his TDS Factor.
Alternatively, if the shooter is using a particular factory load listed in the
scope’s instruction sheet, he may determine his TDS Factor by simply reading it
off the chart.
Now knowing his TDS Factor, he chooses from among a number of TDS Factor
reference stickers included with his new scope. This is what they look like:
Depending on the ballistic characteristics of his particular situation, the
various “Range Marker Bars” (RMBs) are the hold points for the distances shown
on the corresponding sticker. For shooting to distances between those shown
for the RMBs, the shooter estimates his hold between the bars. The numbers
aligned vertically along the left side on each sticker, from 0 to 11, are the
drop in minutes-of-angle (MOA) or inches-per-hundred-yards (IPHY).
The shooter may elect to either put the sticker on his rifle or scope, or he
may want to commit the information on the sticker to memory -- or both. The
important point to make here is that there are a lot fewer numbers to memorize
with the ballistic reticle system than there are with the click-chart system,
so memorization is a very viable option.
I said that this is a shortcut method. From that, you may surmise that there
is a long method. There certainly is. The longer method is more precise. It
is the method that I use and would recommend to any rifleman committed to
getting the utmost in ballistic precision out of his rifle equipped with a
ballistic reticle scope.
To begin a precision ballistic reticle analysis, you will first need to know
exactly, what are the MOA or IPHY values of the additional hold points on your
reticle. This varies from manufacturer to manufacturer. With Leupold, it even
varies depending on whether you have a “Boone and Crockett” reticle, or the
“Varmint Hunter’s” reticle.
It is given roughly, but not exactly, in the TDS reticle instruction sheet that
comes with the scope. I actually found the exact numbers on the U.S. Patent
Office website in the patent description for the TDS reticle system:
|
The distances or width of the separation between the horizontal hairline and
the first, second, third and fourth range lines below the center point are 2.0,
4.8, 7.5 and 10.5 inches of subtention, respectively.
|
With this information, it is now time to turn to our old friend, Microsoft
Excel, and create a table that shows the drop for each bar at distances out
to 600 yards:
Distance
(yards) |
0 |
100 |
200 |
300 |
400 |
500 |
600 |
| Bar 1 |
0.0 |
-2.0 |
-4.0 |
-6.0 |
-8.0 |
-10.0 |
-12.0 |
| Bar 2 |
0.0 |
-4.8 |
-9.6 |
-14.4 |
-19.2 |
-24.0 |
-28.8 |
| Bar 3 |
0.0 |
-7.5 |
-15.0 |
-22.5 |
-30.0 |
-37.5 |
-45.0 |
| Bar 4 |
0.0 |
-10.5 |
-21.0 |
-31.5 |
-42.0 |
-52.5 |
-63.0 |
Next, we turn this table into a chart:
You may already see where this is starting to lead. The next step is
to use your favorite ballistic software to create a ballistic table
for your rifle, shooting your favorite load. You will be overlaying
the data generated by the ballistic software onto this chart.
But at this point, you need to make a decision. Exactly how will you
sight in your rifle? For the typical “high intensity” bolt action deer
hunting type rifle (most bottlenecked cartridges), I think you have
basically two good choices: Either run your ballistic software to give
you a dead zero at 200 yards, or manipulate your zero so that your
trajectory hits the drop shown for the first bar at 300 yards. Referring
to the table above, you can see that Bar 1 represents 6 inches of drop
at 300 yards for the TDS reticle.
In the real world the difference is whether you will be sighting-in
your rifle and scope at 200 yards or at 300 yards. If you only have
access to a 200-yard range, you should calculate your ballistics for
a 200-yard dead zero.
For this kind of work, sighting-in at 100 yards is too short to know
with any confidence what is happening out at 300 and 400 yards.
Sighting-in at 400 yards is problematic due to the wind becoming a
much more significant factor in where your bullets land. That’s why
I recommend either a 200 yard or a 300 yard distance for basic zeroing,
with 300 yards preferred. At 300 yards, you zero your gun using RMB-1,
instead of the central crosswire.
My favorite load in the Browning for the last several years has been the
Nosler 165 grain Ballistic Tip over 57.5 grains of H4350. This load
achieves 2800 fps. The ballistic software I use most of the time is
RCBS.Load.
I pick the 165 gr. BT from the bullet menu. I adjust the velocity for
2800 fps. I check the environmental factors to make sure that they are
reasonable, and adjust the scope-centerline-over-bore-centerline figure.
Finally, I play with the sight-in variables until I get the closest match
to minus 6.0 inches at 300 yards.
The software will generate a table of drops for whatever intervals you
choose, for however far out you choose. I chose 10 yard intervals out
to 600 yards so that Excel will be able to draw a smooth curve when the
data is input to the spreadsheet. The resulting chart now looks like this:
So what are we looking for in this chart? A couple of things. First,
what is the max rise above the line of sight, and at what distance does
it occur? Is it reasonable? In this example, it is 2.39 inches and it
occurs at 130 yards. I like to keep my max mid-range trajectory under
2.5 inches, so that I never have to concern myself with “hold-under,” so
this is good.
Next, what are the trajectory’s points of intersection with the crosshair
center and the various Range Marker Bars? Examining the chart we see:
| Center |
220 Yards |
| RMB-1 |
300 Yards |
| RMB-2 |
400 Yards |
| RMB-3 |
480 Yards |
| RMB-4 |
560 Yards |
This is the crux of the precision ballistic reticle analysis. The
MOA (or IPHY) values of the RMBs were originally calculated for some
bullet of a particular ballistic coefficient, fired at some specific
velocity. Unless your load has the same exact specifications, your
trajectory will not fall nicely onto the RMBs at perfect 100 yard
intervals.
So if I were to create my own custom ballistic reticle sticker to put
on my rifle it would look like this:
The numbers on my custom sticker tell me to hold dead-on using the
center of the crosshairs from 0 to 220 yards. RMB-1 will be dead-on
at 300 yards, RMB-2 at 400 yards, RMB-3 at 480, and RMB-4 at 560.
On the right side I have added a series of numbers to show at a glance
how many yards each gap between the RMBs represents. This is handy for
quickly estimating the correct hold when the game is at some distance
between the dead-on values of the RMBs. The center of the gap between
the crosshair and RMB-1 is 260 yards (half of 80 plus 220). For game
at 350 yards, the hold is exactly centered between RMB-1 and RMB-2.
The correct hold for other in-between distances are interpolated
accordingly by eye.
All this theory looks great on paper, but how does it work in the real
world? With the Kahles now mounted on the Browning, and with my
ballistics all calculated out, it was time to get outside and throw
some hot lead over long distances! I packed up my truck for a day of
precision rifle play out at my favorite desert practice spot.
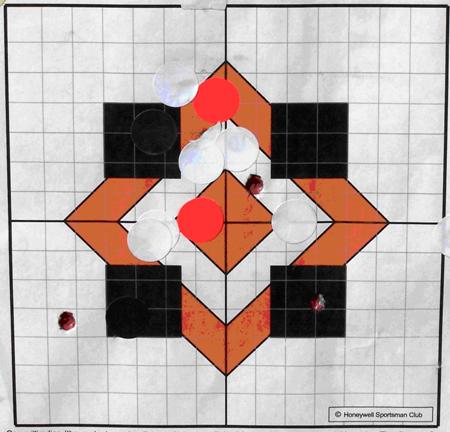
My target of-the-day was the HSC
Mil-Dot
Confidence Target. This is a multiple diamond target with a box
around the perimeter measuring exactly two mils by two mils at 100 yards.
As a reminder, one mil at 100 yards measures 3.6 inches, so in inches,
the perimeter box measures 7.2” x 7.2”.
The importance of these measurements is not about the mils. Rather it
is about the oft-cited recommendation that accurate enough for deer
hunting involves being able to hit a nine-inch diameter paper plate.
Our 7.2” square box roughly translates to that nine inch round paper
plate. I figured that if I could keep the shots within the box, I’ve
got a dead deer.
Since I had not boresighted the scope after mounting it, the first
order of business was to get shots on paper at 50 yards or so. With
that done, I progressively moved out to 100 yards, then 220, then 300.
At 300 yards, I established as perfect a zero as I could, using RMB-1
for my aiming reference. There was some moderate wind on this day,
but mostly it was blowing toward me, not across my trajectory.
With the scope set, I capped the turrets and proceeded to fire 12 more
rounds for final proof shots. I would fire three shot groups at each,
100 yards, 220 yards, 300 yards, and 400 yards. Here are the targets:

100 Yards – Center Crosshair
220 Yards – Center Crosshair
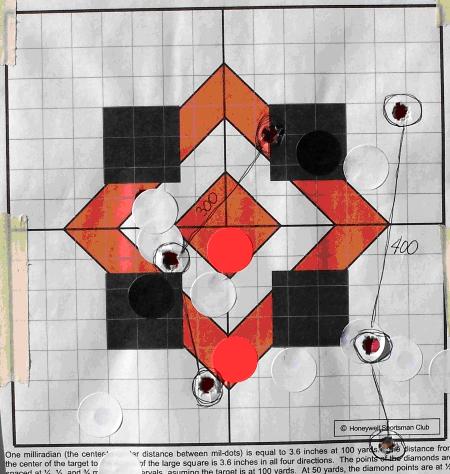
300 yards (RMB-1) and 400 Yards (RMB-2)
The top hole in the 100-yard target looks like it may have keyholed in,
but that’s not the case. The bullet just happened to hit a hole in the
target that was previously patched. This halfway pulled the patch into
the double (triple?) hole.
The three-shot group for the 220-yard target is disappointingly large.
Certainly that’s a dead deer, but I sure would have liked a smaller group.
These were the last shots fired for the day – shots 34, 35, and 36, without
any cleaning. Of course, it also could have been the human factor.
The 300-yard group is decent enough. I measure it at 4¼ inches, or about
1.4 MOA. Dead deer.
The 400-yard group measure 5½ inches, again, about 1.4 MOA. The wind pushed
the group 2½ inches right. One shot dropped low outside of the box. The
radial distance from the center of the target to that hit, is 4.495 inches,
which is just barely within the radius of the mythical nine-inch paper plate.
Dead deer? Probably. But it looks like I’ve reached my practical long range
limit due to accuracy, regardless of ballistic compensation.
A point to keep in mind is that these shots were taken off a benchrest. You
won’t have a benchrest with you out in the field. Though by using the prone
position and rested on a backpack or bipod, one could get awfully close to
benchrest steady.
Some conclusions: First, the precision ballistic reticle analysis that I have
presented here really can help you make some long shots. For example, at 400
yards the trajectory has dropped almost 20 inches below the central crosshair.
But by using the appropriate RMB, you can still land your shots on target.
Just always keep in mind, that in the real world, there’s no such thing as
ballistic perfection.
Second, the inherent accuracy of your rifle may be the limiting factor in how
far you can ethically shoot, even using the best ballistic compensation
techniques. Further work for me will involve trying to wrest a little more
accuracy out of my rifle and ammo. Since switching over to my current load
in this rifle, I have not gone back into another BOSS tuning session to see
whether I really have the optimum adjustment for this load.
Concerning handloading techniques, I have never sorted my cases for either
weight, or by the number of times fired. Fresh cases sorted by weight are two
simple steps I could take to try to find a little more accuracy in my ammo.
After doing what I can to tighten up my rifle’s accuracy, next steps would
involve more practice from field positions to establish my ethical maximum
range under actual hunting conditions. Just because the computer has told
me that RMB-4 will land bullets on target at 560 yards, does not mean that
I have any business shooting that far until I have proven to myself that
making such a shot again and again and again within that nine-inch paper
plate is reality.
The current street price of the Kahles AH3-9x42 TDS is in the $700’s (whew!).
I got it for a good chunk less than that some 3½ years ago. Swarovski
“American” scopes with the TDS reticle go from the low $800’s to over $1000.
But don’t despair! Currently you can get a Burris 3-9x40 Fullfield II scope
with a ballistic reticle for around $200. This year, Leupold is bringing out
a couple of new ballistic reticle scopes in the reasonably–priced VX-I and
VX-II series. One new reticle in these scopes is called the Long Range (LR)
Duplex, similar to the Boone & Crockett reticle in their higher-end scope
lines. For varminters, they are bringing out the LRV reticle only in the
VX-II line.
The ballistic reticle system is inherently faster on target than the
turret-click-chart method. I have too much invested in Weaver V16s to throw
them all away at this point, so I’ll continue using them on the bench, where
I might have time to pull out my reading glasses to make the adjustments; or
on rifles primarily used by my young men. But from here on out, for
extended-range big game hunting, it’s the ballistic reticle for me.